
Your shower is one of the hardest-working fixtures in your home. Over time, leaks appear, pressure drops, and drains clog. Some repairs are simple enough to handle yourself with basic tools and a bit of patience. Others require licensed trades to ensure compliance with Australian building standards and prevent costly water damage down the line.
This guide walks you through the most common DIY shower repair tasks, from changing a shower head to fixing leaking shower taps. You’ll learn what you can tackle on your own, what tools you need, and when it’s time to call in professionals for lasting results.
Key Takeaways
- Many shower issues like low pressure and minor leaks can be fixed with simple DIY methods.
- Regular maintenance, including cleaning shower heads and resealing grout, prevents bigger problems.
- Knowing when to stop and call a licensed renovator protects your home and saves money long-term.
- Professional repairs ensure compliance with NSW building codes and waterproofing standards.
- Anton’s Renovation offers full bathroom upgrades when DIY fixes no longer cut it.
Before diving into repairs, it helps to understand the most frequent shower problems Sydney homeowners face.
Common DIY Shower Repair Issues You Can Fix Yourself
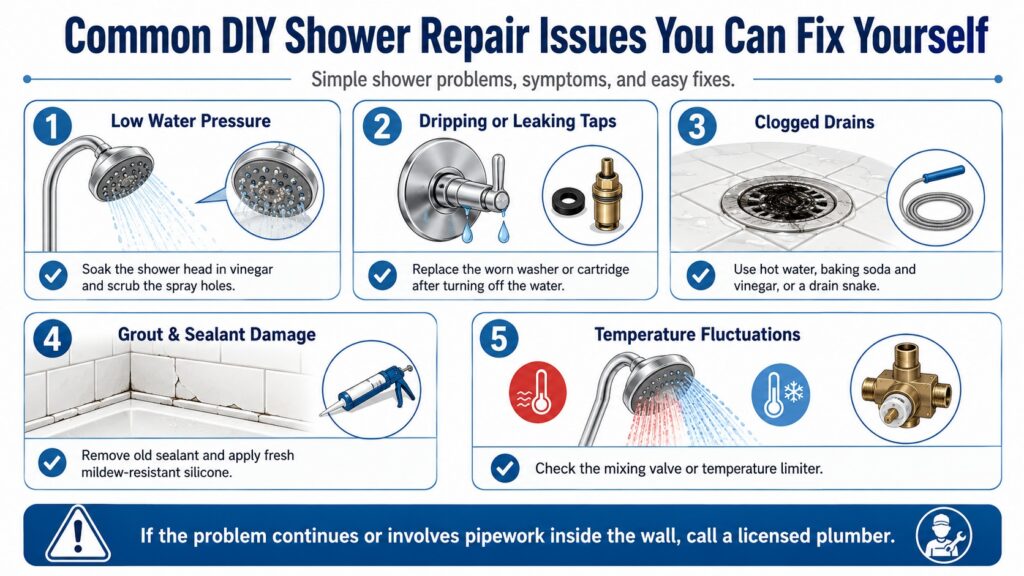
Most shower troubles fall into a few predictable categories. Low water pressure frustrates your morning routine. Leaky taps waste water and drive up bills. Clogged drains turn your shower floor into a shallow pool. The good news is that many of these issues have straightforward solutions you can implement without professional help.
Start by identifying the exact problem. Is water pooling around the base? Does the spray feel weak or uneven? Pinpointing the symptom helps you choose the right fix.
Low Water Pressure
Weak flow often stems from mineral buildup inside the shower head. Sydney’s water can leave calcium and lime deposits that block tiny spray holes. Remove the head, soak it in white vinegar for an hour, then scrub with an old toothbrush. Reattach and test. If pressure remains low, check the main valve to confirm it sits between 40 and 60 PSI.
Dripping or Leaking Taps
A constant drip usually means a worn washer or cartridge inside the tap body. Turn off the water supply at the isolation valve. Unscrew the handle, remove the old washer, and replace it with a matching part from your local hardware store. Reassemble and turn the water back on. If the leak persists, the valve seat may be corroded and need professional attention.
Clogged Drains
Hair, soap scum, and product residue combine to form stubborn blockages. Pour boiling water down the drain to soften the clog. Follow with half a cup of baking soda and half a cup of vinegar. Let it fizz for ten minutes, then flush with hot water. For tougher clogs, use a drain snake to pull out the debris. Avoid harsh chemical cleaners that can damage older pipes.
Grout and Sealant Deterioration
Cracked grout and peeling silicone let water seep behind tiles, risking mold and structural damage. Scrape out the old sealant with a utility knife. Clean the joint with methylated spirits. Apply a fresh bead of mildew-resistant silicone, smooth it with a wet finger, and let it cure for 24 hours. This simple task extends the life of your tile work and keeps moisture where it belongs.
Temperature Fluctuations
Sudden bursts of hot or cold water point to a faulty thermostatic mixing valve. Adjusting the temperature limiter on the valve body can help, but if swings continue, the cartridge may need replacement. This job involves shutting off the main supply and working inside the wall cavity, so consider calling a licensed plumber if you’re unsure.
With these common issues covered, let’s look at the tools and materials you’ll need to tackle them safely.
Essential Tools and Materials for DIY Shower Repair
Having the right equipment on hand makes every repair faster and cleaner. You don’t need a full trade kit, but a few basics will cover most tasks. Keep them organized in a small toolbox so you’re ready when a problem arises.
Invest in quality over quantity. A good adjustable wrench lasts years, while a cheap one strips bolts and wastes your time.
- Adjustable wrench: Grips nuts and fittings of various sizes without damaging chrome finishes.
- Screwdrivers: Both flathead and Phillips head for removing tap handles and cover plates.
- Plumber’s tape: Wraps around threads to create a watertight seal on shower arms and hose connections.
- Utility knife: Cuts away old sealant and grout with precision.
- Drain snake: Reaches deep into pipes to clear hair and soap buildup.
- Vinegar and baking soda: Natural cleaning agents that dissolve mineral deposits and light clogs.
- Replacement washers and cartridges: Stock a few common sizes so you’re not caught short mid-repair.
- Silicone sealant: Choose a mildew-resistant formula rated for wet areas.
Store these items in a dry spot, away from moisture that can rust metal tools or degrade rubber washers. Now that you’re equipped, here’s how to tackle one of the simplest upgrades: changing a shower head.
How to Clean Shower Glass and Prevent Water Spots
Glass screens and doors add a sleek look to any bathroom, but soap scum and hard water stains can turn them cloudy fast. Regular cleaning keeps them sparkling and extends their lifespan. You don’t need harsh chemicals—just a few household staples and a bit of elbow grease.
Start by rinsing the glass with warm water to loosen surface grime. This step makes scrubbing easier and prevents scratching.
Step 1: Mix Your Cleaning Solution
Combine equal parts white vinegar and water in a spray bottle. The acidity cuts through mineral deposits without damaging the glass. For stubborn stains, use undiluted vinegar.
Step 2: Apply and Let It Sit
Spray the solution generously over the entire surface. Let it sit for five to ten minutes so the vinegar can break down the buildup. Don’t rush this step—patience pays off.
Step 3: Scrub Gently
Use a non-abrasive sponge or microfiber cloth to wipe the glass in circular motions. For tough spots, sprinkle a little baking soda on the sponge for extra scrubbing power. Rinse thoroughly with warm water.
Step 4: Dry and Polish
Wipe the glass with a squeegee or a clean, dry towel. This removes water droplets that leave spots as they dry. A quick daily squeegee after each shower prevents buildup and keeps cleaning sessions short.
Step 5: Apply a Protective Coating
Consider using a commercial glass protectant designed for showers. These products create a hydrophobic barrier that repels water and soap, making future cleaning even easier. Reapply every few months for best results.
Clean glass transforms the look of your entire bathroom, but what about the fixtures that deliver the water?
How to Clean Shower Head and Restore Water Flow
A clogged shower head is one of the easiest problems to fix, yet it’s often overlooked. Mineral deposits accumulate over time, blocking spray holes and reducing pressure. Cleaning restores full flow and improves your shower experience without spending a cent.
You can clean the head in place or remove it for a deeper soak. Removing it gives better results, especially if buildup is heavy.
- Turn off the water supply. Locate the isolation valve on the shower arm or shut off the main if you can’t find a local valve.
- Unscrew the shower head. Grip the connector nut with an adjustable wrench, turning counterclockwise. Wrap the nut with a cloth to protect the finish.
- Soak in vinegar. Fill a bowl with white vinegar and submerge the head for at least one hour. For severe buildup, leave it overnight.
- Scrub the nozzles. Use an old toothbrush or a pin to clear any remaining debris from the spray holes. Rinse under running water.
- Reattach the head. Wrap plumber’s tape around the threads of the shower arm, then screw the head back on hand-tight. Turn the water on and check for leaks.
If the head still sprays unevenly after cleaning, the internal screen or washer may be damaged. Replacing the entire unit is often more cost-effective than sourcing small parts.
With your shower head restored, let’s move on to another common task: changing a shower head entirely.
Changing a Shower Head: A Simple Upgrade
Swapping out an old shower head for a new model is one of the quickest ways to refresh your bathroom. Modern heads offer features like water-saving modes, adjustable spray patterns, and handheld options. The job takes less than ten minutes and requires only basic tools.
Choose a head that matches your water pressure and personal preferences. High-pressure models work well in homes with strong flow, while aerated heads suit lower-pressure systems.
Remove the Old Head
Turn off the water at the isolation valve. Use an adjustable wrench to loosen the connector nut, turning counterclockwise. If it’s stuck, apply a few drops of penetrating oil and wait a few minutes. Protect the chrome finish by wrapping the nut with a cloth before gripping.
Clean the Threads
Wipe the exposed threads on the shower arm with a damp cloth. Remove any old plumber’s tape or debris. This ensures a clean seal when you attach the new head.
Apply Plumber’s Tape
Wrap two or three layers of tape clockwise around the threads. Press it down firmly so it doesn’t bunch up. This creates a watertight seal and prevents leaks.
Attach the New Head
Screw the new head onto the arm by hand, turning clockwise. Tighten gently with the wrench, being careful not to overtighten and crack the fitting. Turn the water back on and check for drips at the connection.
Test the Spray Patterns
Run the shower and cycle through the different settings. Make sure each mode works smoothly and that water flows evenly. If you notice leaks, unscrew the head, add another layer of tape, and reattach.
A new shower head can make a big difference, but what if the problem lies deeper—like a leaking tap?
How to Fix Leaking Shower Tap and Save Water
A dripping tap wastes hundreds of liters of water each year and drives up your utility bills. Most leaks come from worn washers, O-rings, or cartridges inside the tap body. Replacing these parts is straightforward if you follow a methodical approach.
Before you start, identify whether you have a compression tap, ceramic disc tap, or cartridge tap. Each type has a slightly different repair process, but the general steps remain the same.
Turn Off the Water Supply
Locate the isolation valve for your shower, usually behind an access panel or under the sink. Turn it clockwise to shut off the flow. If you can’t find a local valve, turn off the main supply at the meter.
Remove the Tap Handle
Pop off the decorative cap with a flathead screwdriver to reveal the retaining screw. Unscrew it and lift the handle straight up. Some models have a grub screw on the side—loosen it with an Allen key.
Extract the Cartridge or Washer
Use an adjustable wrench to unscrew the bonnet nut or cartridge retainer. Pull out the old cartridge or washer. Take it to a hardware store to find an exact match, as sizes vary between brands.
Install the New Part
Slide the new washer or cartridge into place, making sure any grooves or tabs align correctly. Screw the bonnet nut back on hand-tight, then give it a quarter turn with the wrench. Reattach the handle and decorative cap.
Test for Leaks
Turn the water supply back on slowly. Open the tap fully, then close it. Check for drips at the spout and around the base. If water still seeps out, the valve seat may be corroded and require professional regrinding or replacement.
Fixing a leaking tap is satisfying, but some repairs go beyond DIY limits.
When to Call a Licensed Renovator for Shower Repairs
DIY fixes work well for surface-level issues, but structural problems demand professional expertise. Water damage behind tiles, faulty waterproofing, and corroded pipes can escalate quickly if not addressed by licensed trades. Knowing when to stop prevents costly mistakes and keeps your home safe.
If you notice any of the following signs, it’s time to call in the experts.
| Issue | DIY or Professional? | Why |
|---|---|---|
| Cracked shower pan | Professional | Requires waterproofing compliance and structural repair |
| Persistent leaks after DIY fix | Professional | May indicate hidden pipe damage or valve seat corrosion |
| Mold behind tiles | Professional | Needs full tile removal, waterproofing, and mold remediation |
| Low pressure throughout the house | Professional | Could signal main line issues or pressure regulator failure |
| Outdated plumbing materials | Professional | Galvanized or lead pipes require licensed replacement |
At Anton’s Renovation, we handle full bathroom upgrades when DIY repairs no longer deliver lasting results. Our team brings over 15 years of experience to every project, ensuring compliance with NSW Fair Trading requirements and Australian building standards. From waterproofing to fixture installation, we use premium materials and transparent processes so you know exactly what to expect.
If your shower issues keep coming back, or if you’re ready to transform your entire bathroom, give us a call at 0466 334 065 or request a free onsite quote. We’ll assess your space, explain your options in plain language, and deliver a renovation that works for your lifestyle and budget.
Everything Shower Maintenance Tips for Long-Term Performance
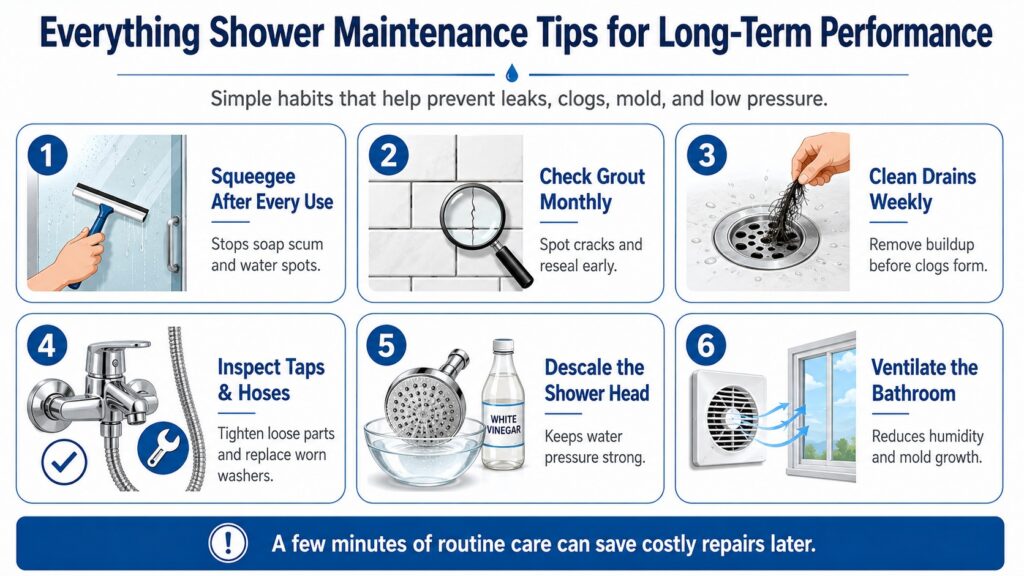
Prevention beats repair every time. A few simple habits can stop most shower problems before they start. You don’t need to spend hours on upkeep—just a few minutes each week makes a big difference.
Think of maintenance as an investment. Small efforts now save you from big headaches later.
- Squeegee after every use: Wipe down glass and tiles to prevent soap scum and water spots. This takes 30 seconds and keeps surfaces looking new.
- Check grout monthly: Look for cracks or missing sections. Reapply sealant as soon as you spot damage to keep water out.
- Clean drains weekly: Remove the cover and pull out any hair or debris. A quick rinse with hot water keeps clogs at bay.
- Inspect taps and hoses: Tighten any loose connections and replace worn washers before they start leaking.
- Descale the shower head quarterly: Soak it in vinegar to dissolve mineral buildup and maintain strong pressure.
- Ventilate the bathroom: Run the exhaust fan during and after showers to reduce humidity and prevent mold growth.
These habits are easy to adopt and they protect your investment in your home. If you’re planning a full bathroom renovation, we design spaces that are both stunning and simple to maintain. Our renovators select durable fixtures, mold-resistant materials, and layouts that make cleaning effortless.
Routine care keeps your existing shower in top shape, but what if you’re dreaming of a complete transformation?
Why Choose Anton’s Renovation for Your Bathroom Upgrade
When DIY fixes stop working or you’re ready for a modern, functional bathroom, Anton’s Renovation delivers end-to-end solutions across Sydney Metro. We specialize in bathroom upgrades, kitchen transformations, laundry redesigns, and accessibility renovations. Every project is tailored to your vision, backed by transparent pricing and a fast turnaround that respects your home and schedule.
Our team holds current NSW licensing and insurance, and we comply with all relevant Australian building codes. From initial consultation through to final handover, we guide you through every step in clear, simple language. You’ll know exactly what’s happening, when it’s happening, and what it costs—no surprises, no shortcuts.
We serve homeowners across the Inner West, Eastern Suburbs, North Shore, Northern Beaches, Hills District, Western Sydney, Sutherland Shire, and beyond. Whether you’re updating a heritage terrace or modernizing a family home, we bring craftsmanship, compliance, and creativity to every job.
Our process is straightforward. We start with a free onsite consultation to understand your needs and measure your space. Next, we present design options and material selections that fit your budget and style. Once you approve the plan, our licensed trades handle waterproofing, tiling, plumbing, and finishing with meticulous attention to detail. We document progress clearly and back our work with a strong service guarantee.
If your shower is showing its age or you’re ready for a complete bathroom makeover, call 0466 334 065 or book a free consultation. We’ll turn your ideas into a space that works beautifully for years to come.
Conclusion
Simple DIY shower repairs can restore function and save water, but knowing your limits protects your home from bigger issues. Tackle straightforward tasks like cleaning heads and replacing washers, then call licensed professionals for structural work. A well-maintained shower enhances daily comfort, and a thoughtfully renovated bathroom adds lasting value to your Sydney home.
Antons Renovation brings over 15 years of bathroom renovation expertise to Sydney homeowners. Our licensed team handles everything from minor repairs to complete transformations with precision and care. Get started on your shower upgrade today.
Related Articles
- Top 5 DIY Bathroom Renovation Tips for Busy Homeowners
- Bathroom Waterproofing Basics to Prevent Leaks and Water Damage
- DIY Regrouting Shower vs Hiring a Professional
FAQs
What Are Common DIY Shower Repairs?
Common DIY shower repairs include fixing leaks, replacing showerheads, regrouting tiles, and unclogging drains. While many homeowners can handle these tasks, it’s important to understand when to call in a professional, like Antons Renovation, to ensure long-lasting results and avoid potential issues.
How Do You Fix A Leaking Shower?
To fix a leaking shower, start by identifying the source of the leak—common culprits are worn-out washers or seals. Shut off the water supply, disassemble the faucet to replace faulty parts, and reassemble everything securely. If you’re unsure, our experienced team at Antons Renovation can provide a thorough assessment and repair.
Can You Replace A Shower Valve Yourself?
Yes, you can replace a shower valve yourself if you have basic plumbing skills. However, it involves shutting off the water supply, removing the handle and trim, and replacing the valve. For a hassle-free experience and expert guidance, consider reaching out to Antons Renovation.
What Tools Do I Need For Shower Repair?
Essential tools for shower repair include a wrench, screwdriver, pliers, utility knife, and a caulking gun. Depending on the specific repair, you may also need additional items like a grout float or a pipe cutter. If you need assistance with your renovation project, Antons Renovation can provide the expertise you need.
How Do You Regrout A Shower?
To regrout a shower, start by removing old grout with a grout saw or scraper. Clean the area thoroughly, mix new grout according to the manufacturer’s instructions, and apply it with a grout float. Finally, wipe off excess grout and allow it to cure. For a flawless finish, consider hiring Antons Renovation to handle the job professionally.
