
Renovating a bathroom can feel overwhelming when you’re juggling work, family, and daily commitments. The good news is that many bathroom upgrades don’t require a full-scale professional overhaul. With the right approach, you can refresh your space on your own schedule and budget.
This guide walks you through five practical DIY bathroom renovation tips designed specifically for busy homeowners. You’ll learn which projects you can tackle yourself, what materials work best, and when it makes sense to bring in licensed professionals for peace of mind.
Key Takeaways
- Start with a clear plan and realistic timeline to avoid mid-project stress.
- Focus on high-impact updates like paint, lighting, and hardware for quick results.
- Choose durable, water-resistant materials to prevent costly repairs down the track.
- Know your limits and call licensed renovators for plumbing, electrical, and waterproofing work.
- Budget for unexpected expenses and keep essential tools on hand before you begin.
1. Plan Your DIY Bathroom Renovation Before You Start
Jumping straight into demolition might feel satisfying, but skipping the planning stage leads to delays, budget blowouts, and half-finished projects. A solid plan keeps you on track and helps you prioritize what matters most. Start by listing everything you want to change, from the vanity to the shower screen.
Measure your bathroom twice. Write down the dimensions of walls, doors, windows, and existing fixtures. These measurements determine what products you can fit and where they’ll go.
Create a simple timeline that respects your schedule. If you can only work on weekends, break the project into manageable chunks. For example, paint one weekend, install new hardware the next, and tackle the vanity later. This approach prevents burnout and keeps your bathroom functional between stages.
Set a realistic budget that includes a 10-15% buffer for surprises. You might discover hidden water damage or realize you need an extra box of tiles. Having that cushion saves you from scrambling mid-project.
Check local regulations before you begin. In New South Wales, certain bathroom work requires licensed tradespeople. Waterproofing, plumbing changes, and electrical installations must meet Australian Standards. If you’re unsure what’s allowed, reach out to a licensed renovator for guidance.
2. Choose Budget-Friendly Materials That Last
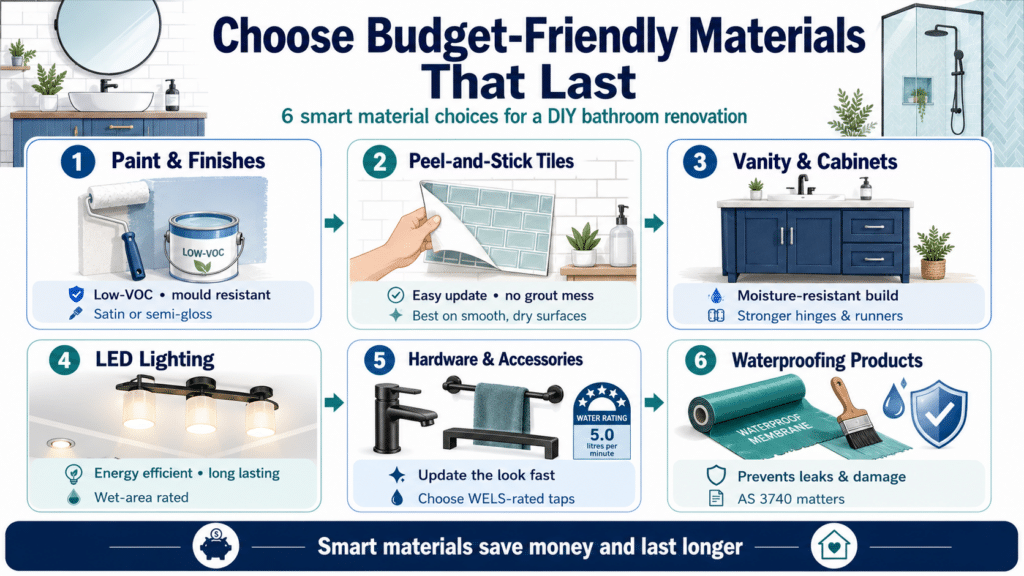
Selecting the right materials makes or breaks a DIY bathroom renovation. You want products that look great, fit your budget, and stand up to moisture and daily wear. Cheap materials might save money upfront but often lead to costly repairs within a year or two.
1. Paint and Finishes
Use low-VOC or zero-VOC bathroom paint to minimize fumes and improve indoor air quality. These paints resist mold and mildew better than standard formulas. Opt for satin or semi-gloss finishes because they’re easier to wipe down and handle humidity.
2. Peel-and-Stick Tiles
Peel-and-stick tiles offer a quick way to refresh walls or floors without grout or adhesive mess. They work well for accent walls or small powder rooms. Just make sure the surface is clean, dry, and smooth before application.
3. Vanity and Cabinets
Bunnings bathroom renovations often feature affordable vanity units that combine storage and style. Look for moisture-resistant MDF or solid timber options with quality hinges and drawer runners. A well-built vanity lasts years longer than a flimsy flat-pack unit.
4. Lighting Fixtures
Swap outdated downlights for energy-efficient LED fittings. LED bulbs use less power and last longer than halogens. Choose fixtures rated for wet or damp areas to meet safety standards.
5. Hardware and Accessories
Updating taps, towel rails, and cabinet handles instantly modernizes a bathroom. Stainless steel and brushed brass finishes are on-trend for 2025. Make sure taps carry a WELS (Water Efficiency Labelling and Standards) rating to save water.
6. Waterproofing Products
If you’re retiling a shower or floor, invest in a quality waterproofing membrane. This step prevents leaks and structural damage. In Sydney, waterproofing must comply with AS 3740. If you’re not confident, hire a licensed professional to handle this critical task.
3. Focus on High-Impact Updates You Can Do Yourself
Not every bathroom renovation requires demolition and major construction. Some of the most dramatic transformations come from simple cosmetic updates. These projects deliver visible results without eating up your weekends or draining your savings.
- Refresh the paint: A fresh coat of paint changes the entire mood of a bathroom. Choose a light, neutral color to make small spaces feel larger. Don’t forget to paint the ceiling for a cohesive look.
- Upgrade lighting: Replace old fixtures with modern LED downlights or wall sconces. Better lighting improves functionality and makes the room feel brighter and more inviting.
- Install new hardware: Swap out old cabinet handles, drawer pulls, and towel bars. This quick update takes less than an hour but makes a big difference.
- Add storage solutions: Floating shelves, over-the-toilet cabinets, and wall-mounted baskets reduce clutter. Budget small bathroom ideas often include vertical storage to maximize space.
- Update the mirror: Replace a builder-grade mirror with a framed version or a stylish round design. A new mirror becomes a focal point and enhances natural light.
- Change the shower curtain or screen: If you have a shower curtain, upgrade to a modern fabric option with a quality liner. If you have a dated screen, consider replacing it with a frameless glass panel.
These updates work well on their own or as part of a staged renovation. You can tackle one project at a time without disrupting your daily routine. If you’re planning a more extensive remodel, these changes can serve as a temporary refresh while you save for the full renovation.
4. Stay on Budget and Timeline
Staying on budget and on schedule is one of the most important parts of a successful bathroom renovation, especially when you are managing the work yourself. DIY projects often take longer than expected because they must fit around work, family responsibilities, and limited weekend hours. A clear plan, realistic deadlines, and careful cost tracking can help keep the renovation moving without unnecessary delays or surprise expenses.
- Break the project into phases so each stage has its own budget and deadline.
- Track every expense in a simple spreadsheet, including materials, tools, and any professional services.
- Order materials in advance to avoid delays caused by low stock or long lead times.
- Set aside a contingency fund of around 10–15% of your total budget for unexpected issues.
- Be realistic about how much time you can actually dedicate to the renovation each week.
- Communicate with your household so everyone knows when the bathroom will be unavailable and what backup arrangements are in place.
A bathroom renovation is much easier to manage when you plan for both time and cost from the start. Small habits like tracking spending, phasing the work, and preparing for delays can make a major difference in keeping the project under control. By staying organized and realistic, homeowners can complete their renovation with less stress and fewer budget blowouts.
5. Maximize Small Bathroom Spaces
Small bathrooms need smart planning to feel comfortable, practical, and visually open. In many Sydney homes, limited floor space means every design choice has to work harder to improve storage, movement, and overall appearance. The right layout and fixtures can make a compact bathroom feel more spacious without requiring a major increase in budget.
- Choose a wall-hung vanity to create a more open look and make floor cleaning easier.
- Install a large mirror to reflect light and visually expand the room.
- Use light colours on walls, floors, and fixtures to make the space feel brighter and airier.
- Opt for a frameless glass shower screen to maintain sightlines and reduce visual bulk.
- Add recessed shelving in the shower or above the toilet for storage without taking up extra room.
- Consider a compact toilet with a concealed cistern to save space and create a cleaner profile.
- Upgrade to a rain shower head or handheld unit with multiple settings for better comfort without major structural work.
A small bathroom can still feel stylish and functional when the design is focused on space-saving choices and visual simplicity. Features like floating vanities, frameless glass, and built-in storage help reduce clutter and improve the way the room feels day to day. With thoughtful planning, even a compact bathroom can look larger, work better, and feel more enjoyable to use.
Avoid Common DIY Bathroom Renovation Mistakes
DIY bathroom renovations can save money and give homeowners more control over the finished result, but they also come with plenty of opportunities for mistakes. Small oversights in preparation, timing, safety, or material choices can quickly turn a simple project into a costly and frustrating one. Understanding the most common DIY bathroom renovation mistakes makes it easier to plan properly and avoid problems that affect both the finish and the function of the space.
Skipping Proper Surface Preparation
Proper preparation is essential before painting, tiling, or installing new finishes in a bathroom. Surfaces need to be cleaned, sanded, levelled, and cleared of old adhesive or residue so that new materials bond correctly and last longer. When this step is rushed or skipped, paint can peel, tiles can lift, and the final result often looks uneven or fails prematurely.
Using the Wrong Tools
Using poor-quality or unsuitable tools can make bathroom renovation work slower, harder, and less accurate. Basic tasks such as painting, cutting tiles, measuring, and fitting fixtures all depend on having the right equipment to achieve a clean and professional-looking outcome. Investing in reliable tools helps reduce frustration, improve accuracy, and prevent unnecessary mistakes during the project.
Underestimating Drying and Curing Times
Drying and curing times are often overlooked in DIY bathroom renovations, especially when homeowners are eager to move from one stage to the next. Paint, grout, adhesives, sealants, and waterproofing products all need enough time to set properly before they are exposed to water or further work. Rushing this process can weaken the finish, reduce durability, and create problems that may only appear later.
Ignoring Ventilation
Ventilation is a critical part of bathroom performance because moisture builds up quickly in enclosed wet areas. Without proper airflow, humidity can linger on walls, ceilings, grout lines, and fixtures, increasing the risk of mould, mildew, and material deterioration. Installing and using an exhaust fan correctly helps protect the bathroom and supports the long-term success of the renovation.
Choosing Trendy Over Timeless Designs
Design choices that feel exciting now may not always age well over time, especially in a room as practical and frequently used as the bathroom. Strong trends can quickly make the space feel dated, while more neutral colours and classic layouts tend to remain appealing for longer. A more timeless design approach creates flexibility and allows personality to come through in accessories that are easier to update later.
Forgetting to Turn Off Water and Power
Safety should always come first in any bathroom renovation because water and electricity create a high-risk environment when combined. Failing to shut off the water supply or the relevant power circuit before starting work can lead to leaks, damage, or serious personal injury. Taking time to confirm both are off before beginning helps prevent dangerous situations and costly accidents.
Not Protecting Existing Fixtures and Surfaces
Existing floors, fittings, hardware, and surrounding surfaces can easily be damaged during a DIY renovation if they are left exposed. Drop sheets, masking tape, and temporary covers help protect these areas from dust, scratches, splashes, and impact while work is underway. This simple precaution reduces cleanup, preserves undisturbed parts of the bathroom, and helps the project stay looking neat throughout the renovation.
Avoiding common DIY bathroom renovation mistakes starts with slowing down and giving each stage the attention it needs. Good preparation, proper tools, realistic timing, and careful protection of the space all contribute to a smoother and more successful renovation. By understanding where DIY projects often go wrong, homeowners can work more confidently and achieve a better long-term result.
Know When to Call a Licensed Professional
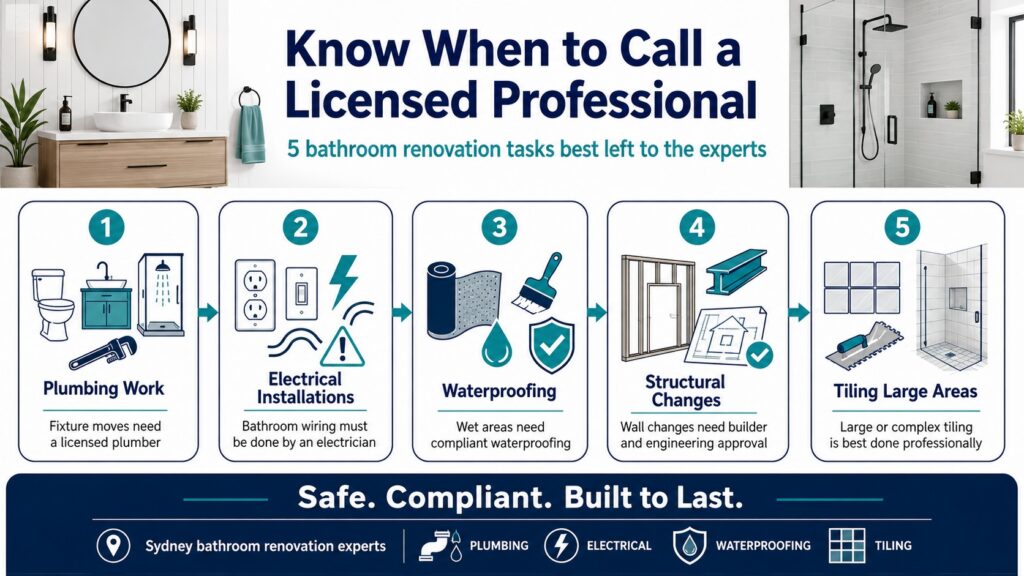
DIY projects can save money, but some tasks require licensed tradespeople for safety, compliance, and long-term durability. Attempting complex work yourself can lead to expensive mistakes, failed inspections, and even safety hazards. Here’s when you should step back and bring in the experts.
Plumbing Work
Moving or installing new plumbing fixtures requires a licensed plumber in New South Wales. This includes relocating toilets, vanities, showers, and baths. Even small leaks can cause water damage and mold growth, so proper installation matters.
Electrical Installations
Any work involving wiring, switches, or outlets must be done by a licensed electrician. Bathrooms have strict electrical safety rules because of moisture. DIY electrical work is illegal in NSW and voids your home insurance.
Waterproofing
Waterproofing wet areas like showers, baths, and floors is a specialized skill. Incorrect waterproofing leads to leaks, structural damage, and costly repairs. Licensed professionals understand the requirements of AS 3740 and provide certification upon completion.
Structural Changes
Removing walls, enlarging doorways, or altering load-bearing structures requires engineering approval and licensed builders. These changes affect your home’s safety and must meet building codes.
Tiling Large Areas
While small tiling jobs can be DIY-friendly, large or complex areas benefit from professional tilers. They ensure proper substrate preparation, waterproofing, and grout application. Poor tiling leads to cracked tiles and water ingress.
We specialize in full bathroom renovations across Sydney, from design through to handover. Our team handles all plumbing, electrical, waterproofing, and tiling work to Australian Standards. If you’re planning a major update, we can guide you through the process with transparent pricing and a fast turnaround.
Conclusion
DIY bathroom renovations offer a rewarding way to refresh your home on your own schedule. Focus on planning, choose quality materials, and know when to call licensed professionals for technical work. For a full renovation with guaranteed results, contact us at 0466 334 065 or request a free onsite quote today.
Antons Renovation brings over 15 years of bathroom expertise to Sydney homeowners. We handle full upgrades with precision and minimal disruption. Get started with a trusted local team today.
Related Articles
- 5 Common Bathroom Renovation Planning Mistakes to Avoid
- How to Plan a Realistic Bathroom Renovation Timeline Without Delays
- DIY Shower Repair Tips Every Homeowner Should Know
FAQs
What Are The Steps To A DIY Bathroom Renovation?
Begin by assessing your current bathroom and planning your layout. Next, create a budget and gather necessary permits if required. Once ready, demo the existing fixtures, followed by plumbing and electrical work as needed. Install new tiles, fixtures, and finishes, ensuring to follow manufacturer guidelines. Finally, add the finishing touches like accessories and decor. For a seamless experience, consider consulting with professionals like Antons Renovation.
How Much Does A DIY Bathroom Renovation Cost?
The cost of a DIY bathroom renovation can vary widely based on materials and scope, typically ranging from $3,000 to $10,000. However, unexpected expenses can arise, so it’s wise to budget an additional 10-20% for contingencies. For tailored solutions that fit your budget, consider reaching out to Antons Renovation for expert guidance.
What Materials Do I Need For A DIY Bathroom Renovation?
Essential materials for a DIY bathroom renovation include tiles, grout, fixtures (sink, toilet, shower), cabinetry, paint, and flooring. You may also need tools like tile cutters, drills, and plumbing tools. For a well-rounded approach and high-quality finishes, Antons Renovation can recommend trusted suppliers and materials.
How Long Does A DIY Bathroom Renovation Take?
A DIY bathroom renovation can take anywhere from a few days to several weeks, depending on the complexity of the project and your experience level. Proper planning can help expedite the process. If you’re looking for efficiency and expertise, consider partnering with Antons Renovation for a faster turnaround.
What Are Some Common Mistakes To Avoid In A DIY Bathroom Renovation?
Common mistakes include underestimating costs, neglecting proper ventilation, and rushing the planning phase. Additionally, not accounting for plumbing and electrical codes can lead to delays. To avoid these pitfalls and ensure a successful renovation, enlist the expertise of Antons Renovation, who will guide you through each step with confidence.
