Water damage in bathrooms can lead to expensive repairs, structural issues, and health risks from mould growth. Proper waterproofing protects your home by creating a barrier that stops moisture from seeping into walls, floors, and subfloors. Every Sydney homeowner should understand the fundamentals of bathroom waterproofing before starting any renovation or repair project.
This guide covers the essential bathroom waterproofing basics you need to know. You’ll learn about proper preparation, materials, installation techniques, and when to call licensed professionals for guaranteed protection.
Key Takeaways
- Bathroom waterproofing creates a moisture barrier that prevents leaks, mould, and structural damage in wet areas.
- Proper subfloor inspection and preparation form the foundation of effective waterproofing systems.
- Liquid membranes, sheet membranes, and pre-formed systems each offer distinct advantages for different bathroom layouts.
- Critical zones like shower bases, floor-wall junctions, and penetrations require special attention and sealing techniques.
- Professional installation ensures compliance with Australian Standards and provides long-term protection for your investment.
Understanding Bathroom Waterproofing Basics and Why They Matter
Waterproofing means sealing wet areas to prevent water from penetrating surfaces and causing damage. In bathrooms, this protection extends to floors, walls, shower enclosures, and areas around bathroom basins and fixtures. Without proper waterproofing, moisture seeps into building materials and creates problems that worsen over time.
Water damage costs Sydney homeowners thousands in repairs each year. Leaks compromise structural integrity, rot timber frames, and create ideal conditions for mould and mildew. The health risks from prolonged mould exposure include respiratory issues and allergic reactions.
Australian building codes require waterproofing in all wet areas. Compliance protects your property value and ensures your renovation meets legal standards. Licensed contractors understand these requirements and implement systems that pass inspections and provide lasting protection.
Key Areas That Require Waterproofing in Your Bathroom
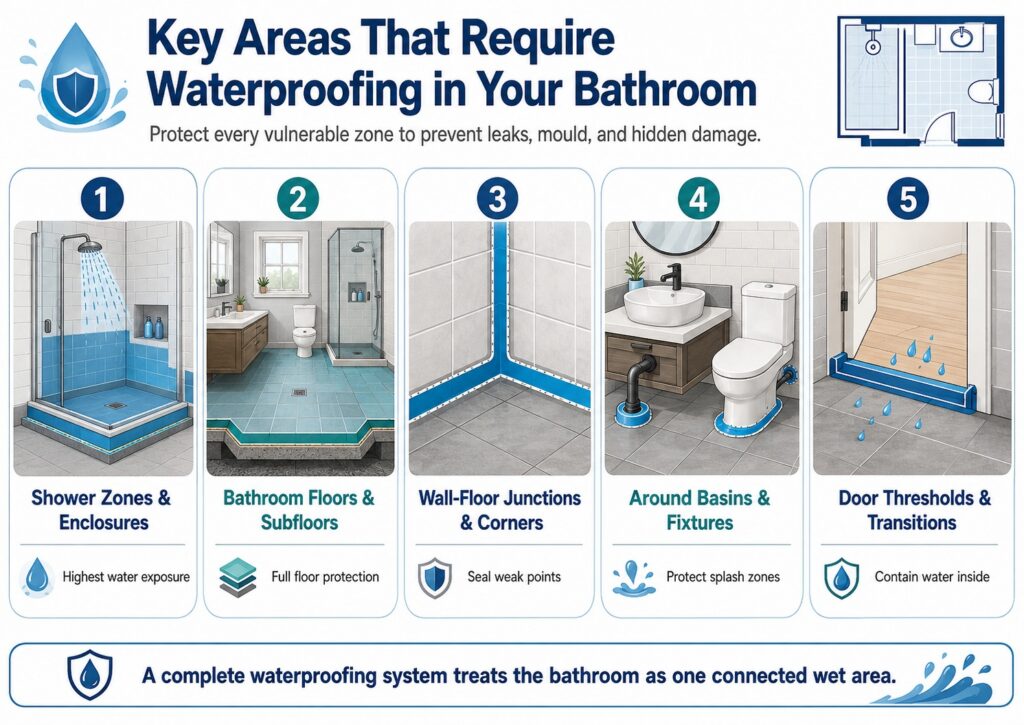
Bathroom waterproofing must cover more than just the most visibly wet parts of the room. Water exposure happens in multiple areas through splashing, steam, condensation, and leaks, so every vulnerable zone needs proper protection. Understanding which areas require waterproofing helps prevent hidden damage, mould growth, and costly structural repairs over time.
Shower Zones and Enclosures
Shower areas require the highest level of waterproofing because they are exposed to water every day. The shower floor must be fully waterproofed, with the membrane extending up the surrounding walls to protect the most frequently saturated parts of the bathroom. Proper drainage slope is also essential in this zone because standing water can eventually find weak points in the waterproofing system.
Bathroom Floors and Subfloors
The full bathroom floor should be waterproofed because water can travel beyond the immediate shower area through splashing, condensation, or accidental overflow. The membrane should continue up the walls to form a protective barrier that helps contain moisture within the bathroom. Subfloor condition is also important, as uneven or damaged surfaces can weaken the membrane and lead to cracking or failure.
Wall-Floor Junctions and Corners
Wall-floor junctions and internal corners are common weak points in bathroom waterproofing systems. These areas are more vulnerable because building movement, temperature changes, and daily use can create small gaps where water may enter. Reinforcement and proper membrane overlap are necessary here to maintain a continuous and reliable seal.
Around Bathroom Basins and Fixtures
The areas around bathroom basins, toilets, and other fixtures also need careful waterproofing attention. Water regularly splashes around these fittings, and plumbing penetrations create openings that can become leak points if they are not sealed properly. Waterproofing these sections helps reduce the risk of moisture damage building up around frequently used fixtures.
Door Thresholds and Transitions
The doorway and transition point between the bathroom and adjacent rooms should be waterproofed to stop water from escaping into nearby flooring areas. This threshold acts as an important barrier that helps contain leaks, splashes, and overflow within the bathroom itself. Although often overlooked, it plays a key role in protecting hallways, bedrooms, and surrounding finishes from water damage.
Proper bathroom waterproofing depends on treating the room as a connected wet area rather than focusing on just one or two obvious spots. When each key area is sealed correctly, the bathroom is better protected against leaks, movement, and long-term moisture problems. A complete waterproofing approach helps improve durability, compliance, and peace of mind for homeowners.
Essential Materials for Effective Bathroom Waterproofing
Effective bathroom waterproofing depends on choosing materials that suit the layout, substrate, and moisture exposure of the space. Different waterproofing products are designed for different applications, and each one contributes to the overall reliability of the system. Understanding the main material options helps homeowners and renovators make better decisions about performance, installation, and long-term durability.
| Material Type | Main Use | Key Benefit | Important Consideration |
|---|---|---|---|
| Liquid Waterproofing Membranes | Walls, floors, corners, and detailed areas | Creates a flexible and seamless barrier that adapts well to irregular surfaces | Usually requires multiple coats and drying time between applications |
| Sheet Membrane Systems | Large wall and floor surfaces | Provides consistent thickness and immediate waterproofing once installed | Seams and overlaps must be installed carefully to avoid weak points |
| Pre-Formed Shower Systems | Shower bases and enclosed wet areas | Simplifies installation with built-in waterproofing and drainage slope | Must integrate properly with surrounding wall membrane systems |
| Reinforcement Materials | Corners, seams, joints, and transitions | Helps strengthen vulnerable areas and reduce the risk of cracking | Needs to be embedded correctly within the membrane layers |
| Sealants and Caulks | Around fixtures, penetrations, and movement joints | Creates flexible seals that handle expansion and contraction in wet areas | Product quality matters for mould resistance and long-term adhesion |
A strong bathroom waterproofing system relies on the right combination of materials rather than a single product alone. Each component has a specific role in protecting wet areas, sealing movement points, and strengthening vulnerable transitions. By selecting materials carefully and using them in the right places, homeowners can create a more durable and dependable waterproofing system that supports the success of the entire bathroom renovation.
How to Prepare Your Bathroom for Waterproofing
Preparation determines waterproofing success more than any other factor. Rushing this stage leads to failures that require complete system removal and reinstallation. Taking time to properly prepare surfaces saves money and prevents future problems.
1. Inspect the Existing Subfloor
Remove old flooring and examine the subfloor for damage, rot, or deflection. Plywood subfloors should be exterior-grade and properly fastened. Concrete slabs need checking for cracks, level variations, and moisture issues. Any structural problems require repair before waterproofing begins.
2. Repair or Replace Damaged Materials
Cut out and replace rotted timber, damaged plywood, or deteriorated concrete. Subfloor repairs must cure completely before proceeding. Cement board or waterproof backer board works well for bathroom applications because these materials don’t degrade when exposed to moisture.
3. Clean All Surfaces Thoroughly
Waterproofing membranes need clean, dust-free surfaces for proper adhesion. Sweep and vacuum all debris. Wipe surfaces with damp cloths to remove fine dust. Oil, grease, or soap residue prevents membrane bonding and must be completely removed.
4. Fill Cracks and Gaps
Use appropriate fillers to address cracks, gaps, and surface irregularities. Concrete cracks need epoxy or polyurethane injection. Small gaps between boards can be filled with thin-set mortar or specialized crack fillers. Allow all repairs to cure according to product specifications.
5. Prime Surfaces When Required
Some waterproofing systems require primer application to enhance adhesion. Follow manufacturer instructions regarding primer products and application methods. Priming porous surfaces like concrete improves membrane bonding and reduces the risk of delamination.
6. Install Reinforcement at Vulnerable Points
Apply mesh tape or fabric strips to seams, corners, and junctions before membrane application. These reinforcements embed in the first membrane coat and provide extra strength at stress points. Pay special attention to floor-wall junctions and inside corners.
7. Verify Drainage Slopes
Check that floors slope toward drains at the correct gradient. Shower floors need minimum 1:100 fall to ensure water doesn’t pool. Create pre-slope under shower waterproofing using mortar or specialized slope systems. Proper drainage prevents water accumulation that could find membrane weaknesses.
We approach every bathroom renovation with thorough preparation protocols. Our team inspects, repairs, and prepares substrates to manufacturer specifications before applying waterproofing materials.
Professional Installation Steps for Bathroom Waterproofing Systems
Professional installation follows systematic procedures that ensure complete coverage and proper membrane performance. Skipping steps or rushing the process compromises your waterproofing system. Licensed contractors understand these procedures and implement them correctly on every project.
Applying the First Membrane Coat
The first membrane coat establishes your waterproofing foundation. Apply liquid membranes in smooth, even strokes using recommended tools. Sheet membranes require careful positioning and firm pressure to achieve complete adhesion. Work systematically from one area to another to maintain wet edges and prevent lap marks.
Pay extra attention to corners, edges, and transitions. These areas need adequate material coverage without excessive buildup that could crack when dry.
Embedding Reinforcement Materials
While the first coat remains wet, embed reinforcement strips at all vulnerable points. Press fabric or mesh firmly into the membrane to eliminate air pockets. The reinforcement should be completely saturated with membrane material. Overlaps between reinforcement pieces should be at least 50mm.
Installing Penetration Seals
Pipes, drains, and fixtures that penetrate waterproofing require special attention. Pre-formed boots and collars seal around these penetrations. Cut openings precisely to fit around pipes without gaps. Seal the connection between penetration boots and main membrane using compatible products.
Applying Subsequent Membrane Coats
Most systems require two or three membrane coats for complete protection. Allow proper drying time between coats as specified by manufacturers. Apply subsequent coats perpendicular to previous layers to ensure complete coverage. Each coat should achieve specified wet film thickness for proper dried membrane performance.
Conducting Flood Testing
Flood testing verifies your waterproofing system before tile or finish installation. Dam the shower area and fill with water to specified depth. Monitor for two hours minimum, checking for leaks, seepage, or water level drops. This test catches problems while corrections remain simple and inexpensive.
Protecting the Membrane
Once waterproofing passes testing, protect it from damage during subsequent construction. Avoid puncturing membranes with sharp tools or fasteners. Some systems require protection board installation before tile work begins. Careful handling during finishing work preserves waterproofing integrity.
Common Waterproofing Mistakes That Lead to Bathroom Leaks
Bathroom waterproofing can fail even when good materials are used if the installation process is not handled correctly. Small mistakes during preparation, membrane application, or finishing details can create weak points where water eventually penetrates. Understanding these common waterproofing mistakes helps homeowners and renovators reduce the risk of leaks, hidden damage, and costly repairs later.
- Inadequate surface preparation: Applying membranes over dirty, damp, uneven, or damaged surfaces can prevent proper adhesion and lead to early waterproofing failure.
- Insufficient membrane thickness: Thin spots, missed sections, or inconsistent application in liquid membranes leave vulnerable areas where water can enter.
- Skipping reinforcement: Corners, junctions, and movement-prone areas need proper reinforcement to reduce cracking and maintain membrane integrity.
- Improper overlap at seams: Sheet membranes with poor overlap or badly sealed seams create gaps that allow water to migrate behind the system.
- Penetrating the membrane: Drilling, fastening, or damaging the waterproofed surface after installation can compromise the entire barrier.
- Ignoring drainage requirements: Flat surfaces or poor shower falls allow water to pool, increasing pressure on the waterproofing and making failure more likely.
Avoiding these mistakes is essential for creating a bathroom waterproofing system that performs well over time. Many leaks begin with installation errors that are not obvious until moisture has already spread behind walls or beneath floors. By paying close attention to preparation, membrane coverage, reinforcement, and drainage, homeowners can improve durability and reduce the chance of future bathroom leaks.
Maintaining Your Bathroom Waterproofing for Long-Term Protection
Waterproofing systems need minimal maintenance but benefit from regular inspection and care. Simple practices extend system life and prevent small issues from becoming major problems. Most waterproofing failures result from neglect rather than material defects.
Grout and sealant maintenance protects the waterproofing beneath your tile finishes. Grout isn’t waterproof and requires sealing to prevent water penetration. Reapply grout sealer every one to two years depending on usage and product specifications.
Check silicone joints around bathroom basins, tubs, and shower enclosures regularly. Deteriorated or mouldy caulk should be removed and replaced promptly. Fresh sealant maintains the water barrier and prevents moisture from reaching waterproofing layers.
Monitor for signs of water damage like staining, soft spots, or mould growth. These symptoms indicate waterproofing problems that need professional assessment. Early detection allows repairs before extensive damage occurs.
Avoid modifications that penetrate waterproofed surfaces. Installing grab bars, shelves, or accessories requires careful planning to maintain waterproofing integrity. Licensed professionals know how to make necessary penetrations while preserving your waterproof barrier.
Why Professional Bathroom Waterproofing Matters for Sydney Homes
Professional installation provides benefits that far exceed DIY attempts or unlicensed work. Licensed contractors bring expertise, proper materials, and accountability to your bathroom renovation. The investment in professional waterproofing protects your home and provides peace of mind.
We hold current licensing and insurance for all renovation work across Sydney. Our team understands Australian Standards requirements and implements waterproofing systems that meet or exceed code specifications. Every project receives proper documentation including waterproofing certificates required for compliance.
Professional waterproofing includes warranty coverage that protects your investment. If problems develop, licensed contractors return to assess and correct issues. This accountability doesn’t exist with DIY installations or unlicensed workers.
Experienced renovators complete waterproofing efficiently without the trial and error that plagues inexperienced installers. We know which products work best for different applications and how to handle complex details. This expertise saves time and delivers reliable results.
Our waterproofing work integrates seamlessly with other bathroom renovation elements. We coordinate plumbing, electrical, tiling, and finishing trades to ensure every aspect of your project works together. This comprehensive approach creates bathrooms that function beautifully for years.
Compliance Requirements for Bathroom Waterproofing in Sydney
New South Wales building regulations mandate specific waterproofing standards for bathroom renovations. These requirements protect homeowners and ensure consistent quality across the industry. All renovation work must comply with current Australian Standards and Building Code of Australia provisions.
Waterproofing must extend to specified heights and coverage areas based on fixture locations and room layout. Shower areas require the most extensive waterproofing, with membranes covering floors completely and extending up walls as prescribed by regulations.
Licensed contractors must provide waterproofing certificates upon project completion. These certificates document compliance and become part of your property records. Future buyers and building inspectors may request these documents to verify proper installation.
We maintain current knowledge of all applicable codes and standards. Our installations meet NSW Fair Trading requirements and pass inspections without delays or corrections. This compliance expertise gives you confidence that your bathroom renovation is done right.
Transform Your Bathroom With Confidence
Proper waterproofing protects your home from expensive damage while creating bathrooms that serve your family reliably for decades. Professional installation ensures compliance, performance, and peace of mind that DIY approaches cannot match. When you invest in quality waterproofing, you invest in your home’s future.
Antons Renovation delivers expert bathroom waterproofing that protects your home from leaks and costly damage. With 15 years of experience, we ensure lasting results. Get started with a trusted Sydney specialist today.
Related Articles
- Why Bathroom Sealing Services are Essential for Long-Lasting Renovations
- What Causes a Leaking Bathroom and How to Fix It Properly
- Avoid These Common Bathroom Waterproofing Mistakes for Longevity
FAQs
What Is Bathroom Waterproofing?
Bathroom waterproofing is the process of applying protective materials to prevent water from penetrating walls, floors, and other surfaces in the bathroom. This essential step ensures that moisture is contained, reducing the risk of leaks and water damage.
Why Is Waterproofing Important In Bathrooms?
Waterproofing is crucial in bathrooms because it prevents water damage, mold growth, and structural issues. By protecting your home from moisture-related problems, you ensure a healthier living environment and preserve the integrity of your property.
How Do You Waterproof A Bathroom?
To waterproof a bathroom, you typically start by preparing the surfaces, applying a waterproof membrane, and sealing joints and edges. Our skilled team at Antons Renovation follows a detailed process to ensure effective waterproofing that meets Australian building standards.
What Materials Are Used For Bathroom Waterproofing?
Common materials for bathroom waterproofing include liquid membranes, sheet membranes, and waterproof coatings. We source premium materials from trusted suppliers to ensure lasting protection and quality in every renovation project.
How Long Does Bathroom Waterproofing Last?
The longevity of bathroom waterproofing can vary, but with proper application and maintenance, it typically lasts for 10 to 15 years. Our expert team ensures that your waterproofing is done right, maximizing its durability and effectiveness.
