Waterproofing your bathroom is one of the most critical steps in any renovation or new build. A single missed corner or improperly sealed joint can lead to water damage, mould growth, and expensive repairs down the track. For Sydney homeowners planning a bathroom upgrade, understanding the complete waterproofing checklist ensures your shower, floors, and walls remain leak-free for years to come.
This guide walks you through every essential waterproofing step, from surface preparation to final certification. You will learn what to inspect, how to prepare each area, and when to call in licensed professionals to guarantee compliance with Australian Standards.
Key Takeaways
- Proper waterproofing prevents leaks, mould, and structural damage in wet areas.
- Surface preparation, correct membrane application, and joint reinforcement are essential steps.
- Compliance with Australian Standards and certified inspection is mandatory before tiling.
- Professional installation by licensed renovators ensures long-term durability and peace of mind.
- A comprehensive checklist covers substrate assessment, drainage, penetrations, and membrane thickness.
Understanding Bathroom Waterproofing and Why It Matters
Waterproofing is the process of sealing wet areas to prevent water from penetrating walls, floors, and structural elements. In bathrooms, this means creating a watertight barrier around showers, bathtubs, floors, and any surface exposed to moisture. Without proper waterproofing, water seeps into walls and subfloors, causing rot, mould, and costly structural repairs.
Australian building codes require waterproofing in all wet areas, including bathrooms, laundries, and toilets. Compliance is not optional. Licensed inspectors must certify waterproofing work before tiling begins, ensuring your renovation meets safety and quality standards.
For homeowners across Sydney, from the Inner West to the Northern Beaches, investing in professional bathroom waterproofing protects your home and adds long-term value. We have seen firsthand how skipped steps or DIY shortcuts lead to problems years later, often requiring full bathroom strip-outs and re-waterproofing.
Pre-Waterproofing Preparation Checklist
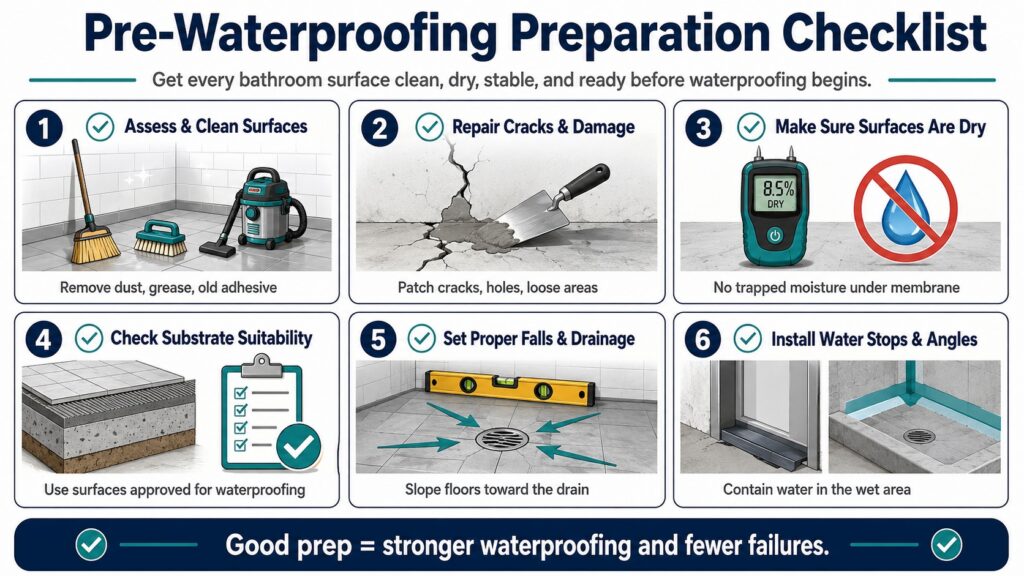
Before any waterproofing membrane touches your bathroom surfaces, thorough preparation is essential. Skipping this stage compromises the entire waterproofing system, no matter how good the membrane is. Every surface must be clean, stable, and ready to bond with the waterproofing product.
Start by inspecting the substrate condition. Look for cracks, loose tiles, or uneven surfaces that need repair before waterproofing begins.
Assess and Clean All Surfaces
Remove all dust, grease, oil, and old adhesive from floors and walls. Use a stiff brush and vacuum to clear debris from corners and joints. Any contaminant left behind will prevent the membrane from adhering properly, creating weak spots where water can penetrate.
Repair Cracks and Damage
Fill any cracks in concrete or cement sheeting with a suitable repair mortar. Small hairline cracks might seem harmless, but they expand under moisture and temperature changes. Patch holes left by old fixtures or pipes, and ensure all repairs are fully cured before moving forward.
Ensure Surfaces Are Completely Dry
Moisture trapped under a waterproofing membrane can cause blistering and delamination. Allow freshly laid screeds or patched areas to dry completely, which may take several days depending on weather conditions. Use a moisture meter if needed to confirm dryness.
Check Substrate Suitability
Not all surfaces are suitable for direct waterproofing. Gypsum plasterboard, for example, requires a primer or cement sheeting overlay in wet areas. Verify that your substrate meets the waterproofing product manufacturer’s specifications and Australian Standards requirements.
Install Proper Falls and Drainage
Floors must slope toward the drain to prevent water pooling. Australian Standards specify a minimum fall of 1:100 in shower areas and 1:80 in general bathroom floors. Use a spirit level to check gradients, and adjust the screed if necessary before waterproofing.
Position Water Stops and Angles
Install water stops at doorways to prevent water escaping the wet area. Place shower angles or hobs at shower entry points to direct water back toward the drain. These barriers are critical for containing water within the waterproofed zone.
Waterproofing Membrane Application Steps
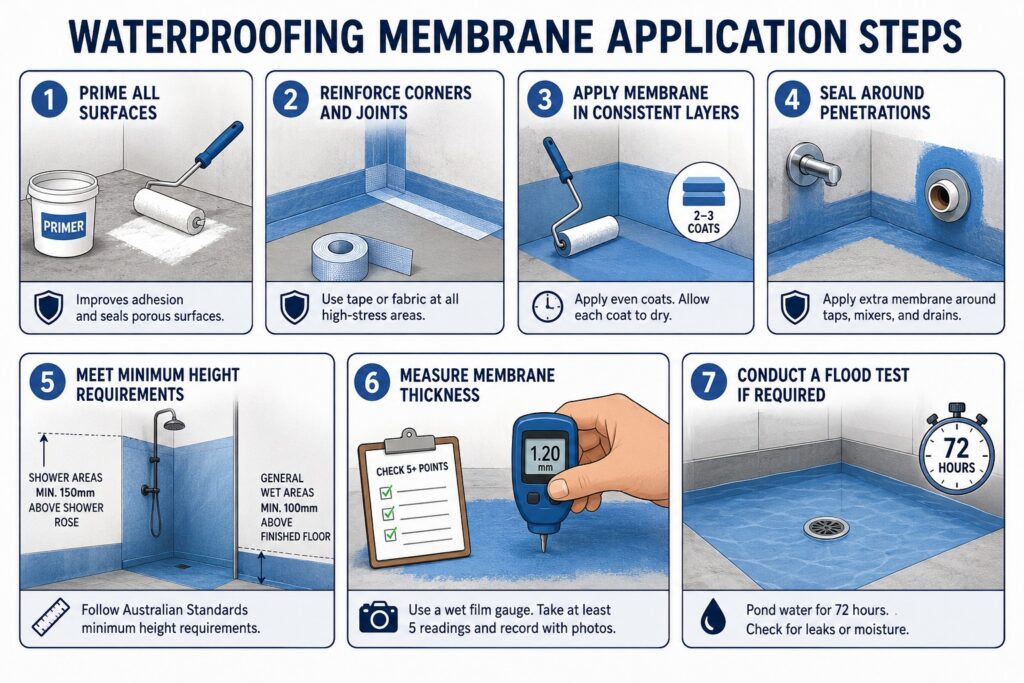
Applying the waterproofing membrane correctly is the heart of your bathroom waterproofing checklist. This stage requires precision, patience, and adherence to product instructions. Membranes come in liquid or sheet form, and each has specific application methods.
Most Sydney renovations use liquid-applied membranes for flexibility and ease of application around complex shapes and penetrations. Sheet membranes are common in commercial projects or large flat areas.
1. Prime All Surfaces
Apply a primer to porous substrates like concrete or cement sheeting. Priming seals the surface, improves membrane adhesion, and prevents air bubbles. Follow the manufacturer’s recommended drying time before applying the membrane.
2. Reinforce Corners and Joints
Use waterproofing tape or fabric bandaging at all internal corners, wall-to-floor junctions, and around penetrations. These high-stress areas are prone to cracking, and reinforcement prevents membrane failure. Embed the tape in the first coat of membrane, ensuring no air pockets remain.
3. Apply Membrane in Consistent Layers
Brush or roll the membrane in even coats, working from top to bottom. Most products require two or three coats to achieve the specified thickness. Allow each coat to dry fully before applying the next, typically two to four hours depending on temperature and humidity.
4. Seal Around Penetrations
Pay special attention to taps, shower mixers, toilet flanges, and waste outlets. Apply extra membrane around these penetrations, and use flanges or collars where recommended. Water often finds its way through poorly sealed fixtures, so take your time here.
5. Meet Minimum Height Requirements
Australian Standards require waterproofing to extend at least 150mm above the shower rose on walls, and 100mm above finished floor level in general wet areas. In enclosed showers, waterproof all walls from floor to ceiling. Mark these heights before you start to avoid missing coverage.
6. Measure Membrane Thickness
Use a wet film thickness gauge to check that each coat meets the manufacturer’s specifications. Record at least five readings across different areas of the bathroom. Insufficient thickness is a common cause of waterproofing failure, so document your measurements with photos.
7. Conduct a Flood Test if Required
Some projects require a 72-hour ponding test to verify waterproofing integrity. Fill the shower base or floor with water to a specified depth, and check for leaks or moisture penetration. This test is more common in multi-level buildings or commercial work.
Inspection and Certification Before Tiling
Once your waterproofing membrane is fully cured, a licensed inspector or certifier must verify compliance before you tile. This step is mandatory under NSW building regulations and protects both homeowners and renovators from future liability. Skipping certification can void insurance and create legal issues if leaks occur later.
The inspector will check substrate preparation, membrane coverage, joint reinforcement, penetration sealing, and height compliance. They will also review your membrane thickness readings and application photos. If everything meets Australian Standards, they issue a waterproofing certificate, which becomes part of your building documentation.
We always schedule inspections at this stage to ensure our work meets every requirement. It gives homeowners confidence and creates a clear record for future buyers or renovations.
Common Waterproofing Mistakes to Avoid
Even experienced renovators can make mistakes during waterproofing if they rush or skip steps. Understanding these common errors helps you avoid costly rework and ensures your bathroom stays dry. Here are the issues we see most often in Sydney bathroom renovations.
Insufficient Surface Preparation
Applying membrane over dirty or damp surfaces is the fastest way to cause adhesion failure. Take the time to clean thoroughly and allow surfaces to dry completely. Moisture meters and patience pay off here.
Skipping Joint Reinforcement
Internal corners and junctions are where most leaks start. Always use waterproofing tape or fabric at these points, even if the membrane manufacturer suggests it is optional. Reinforcement adds minimal cost but prevents major headaches.
Inadequate Membrane Thickness
Applying membrane too thinly or unevenly creates weak spots. Follow the manufacturer’s coverage rates and measure thickness as you go. Two thin coats are better than one thick coat, which can crack as it dries.
Ignoring Height Requirements
Waterproofing that stops short of the required height allows water to seep into walls above the membrane. Measure carefully and extend coverage beyond the minimum to account for splashing and humidity.
Poor Penetration Sealing
Taps, mixers, and waste outlets are common leak points. Use proper flanges, apply extra membrane, and check that all penetrations are fully sealed before inspection. Water always finds the easiest path, and poorly sealed fixtures are an open invitation.
Choosing the Right Waterproofing Products
Not all waterproofing membranes are created equal. Selecting the right product for your bathroom depends on substrate type, application method, and project requirements. Australian Standards specify performance criteria, but within those guidelines, you have choices.
Liquid-applied membranes are flexible and easy to apply around complex shapes. They are ideal for showers with niches, benches, or curved walls. Sheet membranes offer faster coverage on large flat areas but require precise cutting and overlapping at joints.
Look for products with CodeMark or BRANZ certification, which confirms compliance with Australian building codes. Reputable brands provide detailed technical data sheets, application guides, and support from local representatives. We use products we have tested over years of Sydney bathroom renovations, knowing they perform reliably in our climate and building conditions.
When to Call a Licensed Professional
Waterproofing is one area where DIY shortcuts often lead to disaster. While some homeowners have the skills to tackle minor renovations, bathroom waterproofing requires knowledge of building codes, proper application techniques, and inspection requirements. Mistakes here are expensive to fix and can cause serious structural damage.
Licensed renovators bring experience, the right tools, and accountability to your project. We understand substrate preparation, membrane selection, and how to navigate Sydney council requirements. Our work is backed by certification, insurance, and a service guarantee, giving you peace of mind that your bathroom is protected.
If you are planning a bathroom renovation across Sydney, from the Eastern Suburbs to the Hills District, professional waterproofing is a smart investment. Our team handles every step, from initial consultation through to final handover, ensuring your new bathroom is both stunning and watertight.
Bathroom Waterproofing Compliance in Sydney
Sydney homeowners must comply with NSW Fair Trading licensing requirements and Australian Standards for waterproofing work. This means using licensed contractors, following approved methods, and obtaining certification before tiling. Compliance is not just about avoiding fines, it protects your home and ensures your renovation adds value.
Australian Standard AS 3740 sets out waterproofing requirements for wet areas in residential buildings. It specifies minimum membrane coverage, height requirements, and performance criteria. Local councils may have additional requirements, especially in heritage areas or multi-level buildings.
| Waterproofing Element | Requirement | Why It Matters |
|---|---|---|
| Shower walls | Minimum 1800mm height or full height in enclosed showers | Prevents water penetration above the membrane |
| Floor-to-wall junctions | Reinforcement with tape or fabric | Prevents cracking at high-stress points |
| Membrane thickness | As per manufacturer specifications, typically 1.5-2mm | Ensures adequate water barrier |
| Penetrations | Sealed with flanges or extra membrane | Stops leaks around fixtures |
| Certification | Licensed inspector sign-off before tiling | Confirms compliance and protects liability |
We stay current with all regulations and work closely with certifiers to ensure every project meets or exceeds standards. Our streamlined process minimises delays and keeps your renovation on track, without compromising quality or compliance.
Bathroom Waterproofing Checklist Summary
A complete bathroom waterproofing checklist covers every step from surface preparation to final certification. Start by assessing and cleaning all substrates, repairing cracks, and ensuring surfaces are dry. Install proper falls and drainage, position water stops, and prime all surfaces before membrane application.
Apply waterproofing membrane in consistent layers, reinforcing corners and joints with tape or fabric. Seal around all penetrations, meet minimum height requirements, and measure membrane thickness at multiple points. Conduct a flood test if required, and always arrange certified inspection before tiling.
Avoid common mistakes like insufficient preparation, skipped reinforcement, or inadequate membrane thickness. Choose quality products with Australian certification, and work with licensed professionals who understand compliance requirements. Regular maintenance after completion keeps your bathroom dry and functional for years to come.
Conclusion
Proper bathroom waterproofing protects your home from leaks, mould, and structural damage. Following a detailed checklist ensures every step is completed correctly, from surface preparation through to certified inspection. For Sydney homeowners seeking reliable, compliant bathroom renovations, professional waterproofing is a smart investment that delivers lasting peace of mind.
Antons Renovation brings over 15 years of bathroom renovation expertise to every waterproofing project across Sydney. Our licensed team ensures showers, floors, and walls meet Australian standards. Get started with a trusted local specialist today.
Related Articles
- Avoid These Common Bathroom Waterproofing Mistakes for Longevity
- Bathroom Waterproofing Basics to Prevent Leaks and Water Damage
- DIY Shower Resealing Guide for Homeowners
FAQs
What Is A Bathroom Waterproofing Checklist?
A bathroom waterproofing checklist is a comprehensive guide outlining the essential steps and materials needed to ensure that your shower, floors, and walls are properly waterproofed. It includes tasks like assessing existing surfaces, selecting appropriate membranes, and ensuring proper drainage, all crucial for long-lasting and effective waterproofing.
How Do You Waterproof A Bathroom?
To waterproof a bathroom, start by preparing the surfaces, ensuring they are clean and free of damage. Apply a waterproof membrane to the floors and walls, focusing on areas around fixtures and joints. Seal all joints and edges properly, and finish with waterproofing paint or sealant for added protection. Our experienced team at Antons Renovation ensures every step is executed with precision for optimal results.
What Materials Are Needed For Bathroom Waterproofing?
Common materials for bathroom waterproofing include waterproof membranes, sealants, waterproof paint, and specialized adhesives. It’s essential to use high-quality products to achieve a durable and effective waterproof barrier. At Antons Renovation, we source only premium materials to guarantee lasting protection for your home.
How Often Should You Waterproof Your Bathroom?
Typically, bathrooms should be waterproofed every 5 to 10 years, depending on usage and wear. Regular inspections can help identify any signs of wear or damage, allowing for timely maintenance. Our team recommends scheduling a professional review to ensure your bathroom remains in top condition.
What Are The Signs Of Bathroom Waterproofing Failure?
Signs of bathroom waterproofing failure include water stains on walls or ceilings, mold growth, peeling paint, and dampness in adjacent areas. If you notice any of these issues, it’s crucial to address them promptly. At Antons Renovation, we specialize in diagnosing and resolving waterproofing problems to restore your space effectively.
