A leaking shower is one of the most frustrating problems a homeowner can face. Water dripping from the shower head, pooling on the floor, or seeping into walls can lead to costly damage if left unchecked. The good news is that many shower leaks can be identified and repaired quickly with the right approach, saving you both time and money.
This guide walks you through common causes of shower leaks, practical DIY fixes, and when it’s time to call in professionals. You’ll learn how to diagnose the problem, what tools you need, and how to prevent future leaks from wreaking havoc on your bathroom.
Key Takeaways
- Early detection of shower leaks prevents expensive structural damage and mold growth.
- Common causes include worn seals, damaged grout, cracked tiles, and faulty shower heads.
- Simple DIY fixes like regrouting and replacing silicone can cost under one hundred dollars.
- Professional diagnosis ensures compliance with Australian waterproofing standards and long-term results.
- Ignoring leaks can lead to water damage repairs that run into thousands of dollars.
Understanding the Common Causes of Shower Leaking
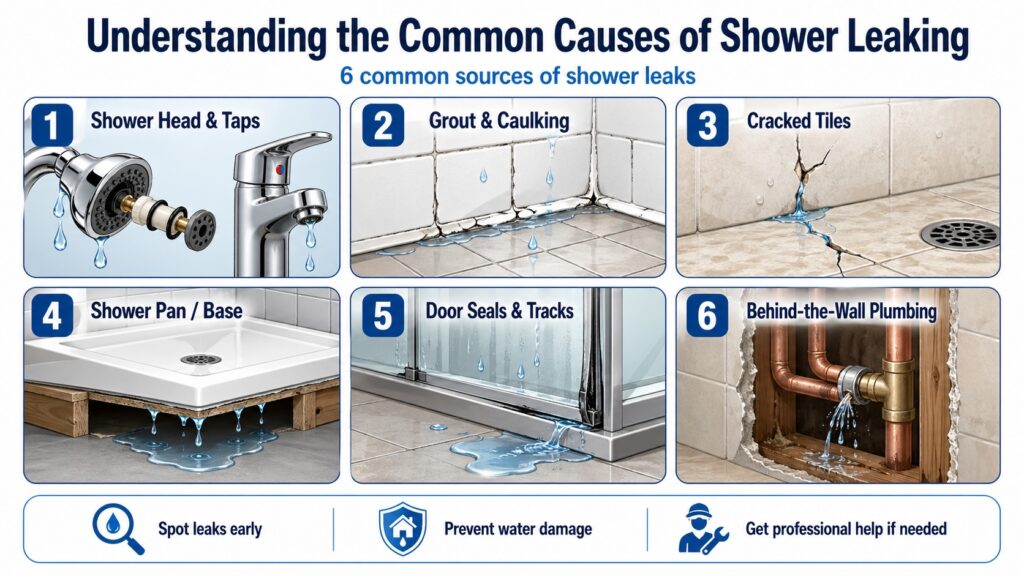
Shower leaks can come from several different sources, and identifying the real cause is the first step toward choosing the right repair. Some leaks are easy to spot, while others develop behind tiles, beneath the shower base, or inside the wall cavity where damage builds over time. Understanding the most common causes of shower leaking helps homeowners recognize warning signs early and avoid unnecessary repair work.
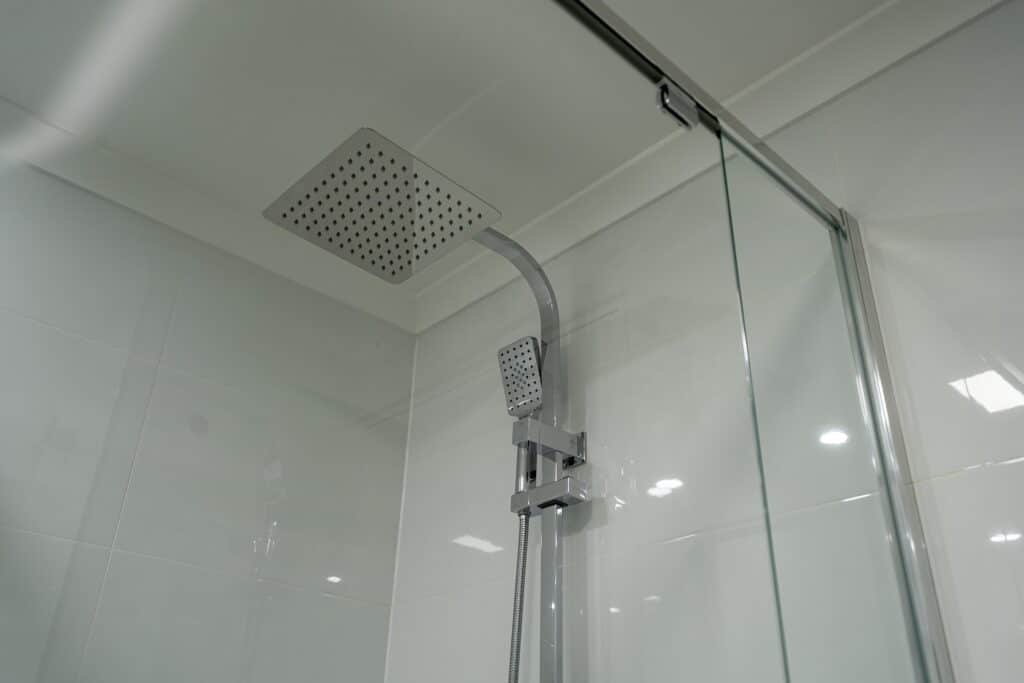
Faulty Shower Head and Tap Components
Worn washers, damaged seals, loose fittings, and mineral buildup inside the shower head or tap assembly are common causes of leaks. These components gradually wear down from regular water exposure and changes in temperature, which can lead to constant dripping even when the shower is turned off. In many cases, replacing small internal parts or tightening loose connections can solve the issue before it worsens.
Deteriorated Grout and Caulking
Grout and caulking play a major role in keeping shower areas watertight, but both materials can break down over time. Cracked grout lines allow water to pass behind tiles, while failing silicone caulk around corners and shower bases can no longer provide a proper seal. Once water starts entering these gaps, it can lead to hidden moisture problems, mould growth, and damage to surrounding surfaces.
Cracked or Damaged Tiles
Cracked, chipped, or loose tiles can allow water to penetrate the protective layers behind the shower wall or floor. Even small hairline cracks may create enough space for moisture to seep through and compromise the waterproofing membrane underneath. When tiles become damaged, the problem is not only cosmetic, as it can also point to deeper structural or water-related issues.
Compromised Shower Pan or Base
The shower pan or base is designed to direct water safely into the drain, but cracks, wear, or installation problems can cause leaks below the visible surface. Because these leaks happen underneath the shower floor, they are often harder to detect until signs of water damage appear elsewhere in the bathroom. A compromised base can lead to long-term issues if it is not diagnosed and repaired properly.
Worn Door Seals and Tracks
Shower doors and screens rely on seals and drainage tracks to keep water contained within the enclosure. When rubber seals wear out or tracks become blocked or damaged, water can escape onto the bathroom floor during normal use. While these issues may seem minor at first, repeated water escape can still damage flooring, skirting, and nearby fixtures over time.
Plumbing Issues Behind the Wall
Some shower leaks come from plumbing components hidden behind the wall rather than the visible shower surface itself. Corroded pipes, loose fittings, failed joints, or damaged supply lines can all cause water to seep into wall cavities without obvious warning signs at first. These types of leaks are often harder to locate and usually require professional inspection to confirm the exact source.
Knowing the common causes of shower leaking makes it easier to respond quickly before the damage spreads further. What looks like a small drip or cracked grout line may actually point to a larger waterproofing or plumbing issue behind the surface. By understanding where shower leaks usually begin, homeowners can make more informed decisions about repairs and protect their bathroom from costly long-term damage.
How to Diagnose a Shower Leak Before Starting Repairs
Proper diagnosis is the first step in any successful shower leaking repair because the wrong assumption can lead to wasted time, materials, and effort. Shower leaks can come from visible surface issues, damaged seals, hidden plumbing faults, or waterproofing failures behind the walls or floor. Taking a systematic approach helps homeowners narrow down the source and choose the most effective repair method before starting any work.
Visual Inspection of Visible Components
A visual inspection is the easiest place to begin when diagnosing a shower leak. Check the shower head, taps, seals, grout lines, caulking, and nearby wall or ceiling surfaces for signs of dripping, staining, mould, soft spots, or visible deterioration. These clues often reveal whether the problem is coming from worn fittings, failed grout, or moisture escaping beyond the shower area.
Water Test with Waterproof Tape
Using waterproof tape over suspected cracks, gaps, or grout lines can help isolate the source of the leak without opening up the shower structure. After sealing the suspected area, run the shower and observe whether the leak continues or stops. If the water no longer escapes, the taped section likely points to the area that needs repair.
Check for Moisture Beneath the Shower
If you can access the ceiling below the bathroom or the area beneath the shower, look for damp patches, water stains, bubbling paint, or signs of mould. Moisture in this area often suggests that water is escaping through the shower base, drain assembly, or pan rather than just from the wall surface. This type of leak is usually harder to detect from above and may require closer inspection.
Inspect the Shower Door and Screen
Shower doors and screens should be checked while the shower is running to see whether water escapes through the edges, over the seal, or around the track. Damaged rubber seals, misaligned doors, or blocked drainage channels can all allow water to spill onto the bathroom floor. In some cases, the leak is not structural at all but simply the result of poor water containment.
Monitor Water Meter for Hidden Leaks
A hidden plumbing leak may exist behind the wall or beneath the floor if no visible shower defect explains the moisture problem. Turning off all water fixtures in the home and then checking whether the water meter continues to move can help confirm if water is escaping somewhere in the system. This method is especially useful when the leak appears persistent but the source is not obvious from a surface inspection.
Diagnosing a shower leak properly helps avoid unnecessary repairs and makes it easier to fix the real problem the first time. Some leaks are caused by visible wear around tiles, doors, or fittings, while others involve hidden plumbing or base failures that require more careful investigation. By following a clear step-by-step process, homeowners can better understand the cause of the leak and know when professional help may be needed.
DIY Shower Leaking Repair Techniques You Can Try Today
Once you’ve identified the source of the leak, you can tackle many repairs yourself with basic tools and materials. DIY fixes are cost-effective and can be completed in a few hours. Just make sure you’re comfortable working with plumbing and waterproofing products before you start.
Always turn off the water supply before beginning any repair. Gather your tools and materials in advance to avoid interruptions. Work in a well-ventilated area and follow product instructions carefully.
Fixing a Leaking Shower Head with Teflon Tape
Remove the shower head by turning it counterclockwise with a wrench. Clean the threads on the shower arm to remove old tape and debris. Wrap new Teflon tape clockwise around the threads, overlapping each layer slightly. Reattach the shower head and tighten it by hand, then give it a quarter turn with a wrench. Turn on the water and check for leaks at the connection.
Replacing Worn Silicone Sealant Around the Shower Base
Use a utility knife or caulk removal tool to cut away old silicone. Scrape off any residue and clean the area with rubbing alcohol. Let the surface dry completely before applying new sealant. Apply a bead of 100 percent silicone caulk along the joint, smoothing it with a wet finger or caulking tool. Allow the silicone to cure for at least 24 hours before using the shower.
Regrouting Cracked or Damaged Grout Lines
Remove old grout using a grout saw or rotary tool with a grout removal bit. Work carefully to avoid damaging the tiles. Vacuum out dust and debris, then wipe the joints with a damp sponge. Mix epoxy grout according to the manufacturer’s instructions and apply it with a rubber float. Press the grout firmly into the joints and remove excess with the float. Allow the grout to set for the recommended time, then apply a waterproof grout sealer.
Replacing Faulty Washers and Seals in Taps
Turn off the water supply and remove the tap handle by unscrewing the retaining screw. Lift off the handle and unscrew the valve stem. Replace the rubber washer and O-ring with new parts of the same size. Reassemble the tap in reverse order and turn the water back on. Test the tap to ensure the leak has stopped.
Sealing Cracked Tiles with Epoxy Filler
Clean the cracked tile thoroughly and let it dry. Apply a small amount of clear epoxy filler to the crack using a toothpick or applicator. Wipe away excess epoxy immediately with a damp cloth. Allow the epoxy to cure fully before exposing it to water. This is a temporary fix and works best for hairline cracks.
When to Call a Professional for Shower Leaking Repairs
Some shower leaks can be handled with basic DIY repairs, but others involve hidden damage, waterproofing failures, or plumbing issues that require professional attention. Knowing when to call a licensed expert can help prevent the leak from getting worse and reduce the risk of costly structural damage. Professional repair services also ensure the work is completed safely, accurately, and in line with building standards.
Structural Damage or Mold Growth
Visible mould, sagging ceilings, warped walls, or soft surfaces around the shower are strong signs that water has already spread beyond the immediate leak area. These problems usually indicate ongoing moisture intrusion that may be affecting framing, insulation, or nearby finishes. Professional assessment is essential because both structural repairs and mould remediation need to be handled correctly to protect the home and the health of its occupants.
Leaks Originating from Behind the Wall
Leaks coming from inside the wall are harder to diagnose and repair without proper tools and experience. Hidden plumbing problems such as corroded pipes, loose fittings, or damaged supply lines often require wall access and pipe replacement. Because this work involves licensed plumbing and compliance requirements, it is best handled by a qualified professional.
Failed Waterproofing Membrane
A failed waterproofing membrane is one of the more serious causes of shower leaks because the issue sits beneath the visible tile surface. Once the membrane is compromised, water can pass through to the structure below or behind the shower, and patch repairs on the surface will not solve the real problem. Professional repairs are necessary because proper waterproofing requires correct product selection, layered installation, and compliance with Australian building standards.
Persistent Leaks After DIY Attempts
If a shower continues leaking after you have already tried to fix it, the issue may be more complex than it first appeared. Multiple faults can exist at the same time, or the original cause of the leak may have been misidentified. A professional can carry out a more thorough inspection and prevent you from wasting more time and money on repeated unsuccessful repairs.
Shower Pan Replacement
A cracked or damaged shower pan often requires major repair work that goes well beyond a simple seal or grout fix. Replacing the shower pan usually involves removing tiles, taking out the old base, checking the drain assembly, and reinstalling waterproofing components properly. This type of repair needs careful handling to ensure long-term performance and prevent future leaks.
Calling a professional at the right time can save you from more extensive damage and repeated repair costs. What starts as a small leak can quickly develop into a much larger issue when waterproofing, hidden plumbing, or structural damage is involved. By knowing when expert help is needed, homeowners can protect their bathroom, maintain compliance, and achieve a more reliable repair outcome.
Preventing Future Shower Leaks with Regular Maintenance
Prevention is always cheaper than repair. Regular maintenance keeps your shower in top condition and helps you catch small issues before they become expensive problems. A few simple habits can extend the life of your shower and protect your home from water damage.
Reapply Grout Sealer Annually
Grout is porous and absorbs water over time. Applying a waterproof grout sealer once a year creates a protective barrier. This simple step prevents moisture from penetrating the grout and reaching the substrate.
Replace Silicone Caulk Every Few Years
Silicone caulk degrades with exposure to water and cleaning products. Inspect caulking around the shower base and door annually. Replace it if you see cracks, gaps, or discoloration.
Clean Shower Heads and Taps Regularly
Mineral buildup from hard water can damage seals and valves. Remove and soak shower heads in vinegar to dissolve deposits. Wipe down taps and fixtures to prevent corrosion.
Ensure Proper Ventilation
Excess moisture in the bathroom accelerates wear on grout, caulking, and seals. Use an exhaust fan during and after showers. Open windows when possible to promote air circulation.
Check Door Seals and Tracks
Inspect shower door seals for wear and replace them if they no longer make a tight seal. Clean drainage tracks regularly to prevent blockages that cause water overflow.
Schedule Professional Inspections
Even with diligent maintenance, some issues aren’t visible to the untrained eye. Professional inspections every few years can catch hidden problems early. We offer fast consultations and onsite assessments to keep your bathroom in peak condition.
Inspect your shower every few months for early warning signs. Look for cracks in grout, loose tiles, or worn caulking. Address minor issues immediately rather than waiting for them to worsen.
Why Choose Professional Shower Leaking Repair Services
Professional repair services offer expertise, compliance, and peace of mind that DIY fixes can’t match. Licensed tradespeople understand building codes, waterproofing standards, and best practices. They use quality materials and proven techniques to deliver lasting results.
At Anton’s Renovation, we bring over 15 years of experience to every project. Our team is fully licensed and insured, and we comply with all NSW Fair Trading requirements. We don’t cut corners or use substandard materials. Every repair is done right the first time, with clear communication and transparent processes.
We serve homeowners across Sydney, including the Inner West, North Shore, Hills District, and beyond. Whether you need a simple seal replacement or a full shower rebuild, we tailor our services to your needs and budget. Our streamlined approach minimizes disruption and delivers fast turnarounds without compromising quality.
Conclusion
Addressing shower leaks promptly protects your home and saves money. Simple DIY fixes work for minor issues, but professional help ensures lasting results. Don’t wait until water damage forces a costly renovation—act now and enjoy a dry, functional bathroom for years to come.
Antons Renovation specialises in bathroom upgrades and leak repairs backed by 15 years of experience. Our licensed team delivers fast, lasting solutions across Sydney Metro. Get started with a trusted local expert today.
Related Articles
- How Much Does Shower Leak Repair Cost? A 2026 Complete Guide
- 5 Signs You Need Professional Shower Leak Repair Today
- Shower Base Repair Tips to Extend the Life of Your Bathroom
FAQs
What Causes A Shower To Leak?
A shower can leak due to various reasons, including worn-out seals, corroded pipes, or damaged showerheads. Poor installation or age-related wear can also contribute to leaks. At Antons Renovation, we have the expertise to identify the source of your shower leak and provide effective solutions.
How Do You Fix A Leaking Shower Head?
To fix a leaking shower head, start by turning off the water supply. Remove the shower head and check the washer or O-ring for damage, replacing it if necessary. Clean any mineral buildup before reassembling. Our skilled team at Antons Renovation can handle this quickly and efficiently for you.
Can A Leaking Shower Be Repaired Without Replacing It?
Yes, a leaking shower can often be repaired without complete replacement. Common issues like sealant or washer replacements can effectively stop the leak. Our experienced professionals at Antons Renovation can assess your situation and determine the best repair options to save you time and money.
What Tools Do I Need To Repair A Shower Leak?
Basic tools for repairing a shower leak include an adjustable wrench, screwdrivers, pliers, and plumber’s tape. Depending on the repair, you might also need a replacement washer or seal. At Antons Renovation, we come equipped with all the necessary tools and expertise to ensure a seamless repair process.
How Much Does It Cost To Repair A Leaking Shower?
The cost to repair a leaking shower varies based on the extent of the damage and the repairs needed. Generally, minor fixes can range from $100 to $300, while more extensive repairs may cost more. Antons Renovation provides tailored solutions that fit your budget while ensuring quality workmanship and lasting results.
