A new shower can transform your bathroom into a functional and stylish space. Yet many homeowners underestimate the technical details that make or break a successful installation. Small oversights during planning or construction can lead to leaks, mould, or fixtures that fail within months.
This guide covers the five most commonly overlooked shower installation basics. You will learn how proper waterproofing, drainage slope, fixture placement, and material selection protect your investment. We also explain when to call a licensed professional to ensure compliance with Australian Standards.
Key Takeaways
- Waterproofing must extend beyond the shower base to prevent structural damage and mould growth in surrounding walls.
- Shower base slope requires precise grading of one-quarter inch per foot to ensure proper drainage and avoid pooling.
- Shower niche placement needs careful planning to avoid compromising wall structure and waterproofing integrity.
- Fixture height and tap placement must align with user needs and plumbing codes for long-term functionality.
- Licensed professionals ensure compliance with NSW building standards and deliver durable, code-compliant installations.
1. Waterproofing Requirements for Shower Installation Basics
Waterproofing is the foundation of any durable shower installation. It prevents water from seeping into walls, floors, and structural framing. Without proper sealing, moisture can cause timber rot, mould, and expensive repairs that extend far beyond the bathroom.
Many homeowners assume waterproofing only applies to the shower base. In reality, Australian Standards require waterproof membranes on all wet-area walls up to a minimum height. This includes areas around the shower niche, tap penetrations, and any joints where different materials meet.
Professional installers use multi-layer waterproofing systems that include primer coats, membrane sheets, and liquid sealants. Each layer bonds to the substrate and creates a continuous barrier. Skipping any step or using substandard products can void warranties and lead to water damage.
2. Correct Shower Base Slope and Drainage Setup
Proper drainage starts with the shower base slope. Water must flow toward the drain without pooling in corners or along walls. Australian plumbing codes specify a minimum gradient of one-quarter inch per foot, but many DIY installations miss this target.
A flat or poorly graded base creates standing water that encourages mould and soap scum buildup. It also places extra stress on grout and sealant joints. Over time, water finds its way through these weak points and damages the subfloor.
Professional installers use laser levels and screed guides to achieve consistent slope across the entire base. They also select drain types that match the shower size and expected water flow. Linear channel drains, for example, require different grading than traditional centre drains.
3. Strategic Shower Niche Placement and Construction
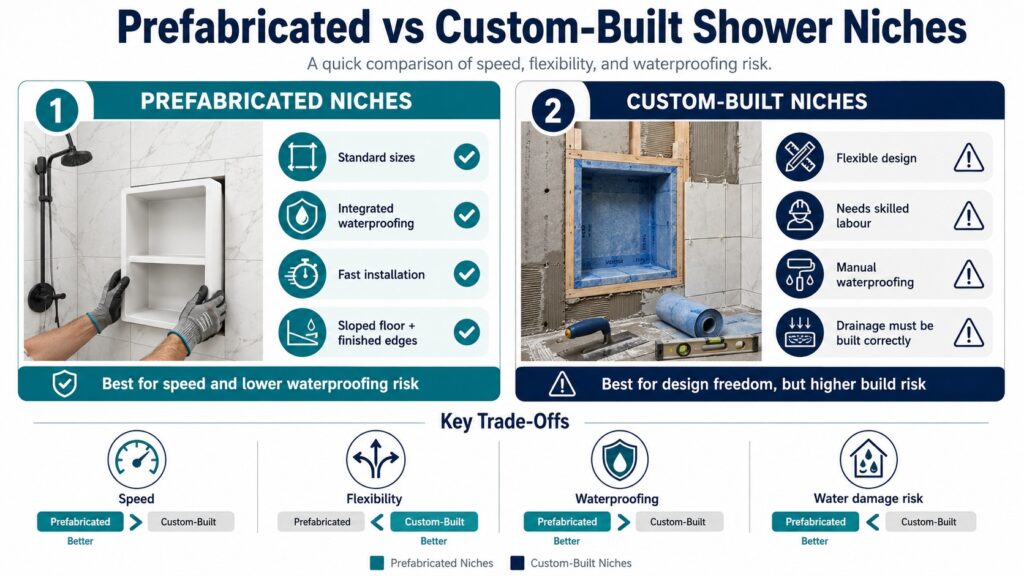
A shower niche provides convenient storage for shampoo, soap, and other essentials. Yet many homeowners treat it as an afterthought and install it without considering structural or waterproofing implications. Poor niche placement can weaken walls, trap water, and create maintenance headaches.
The ideal niche location avoids wall studs, plumbing lines, and electrical conduits. It should sit at a comfortable height for all users and align with tile layouts to minimise cuts. Most professionals recommend placing the niche between shoulder and eye level for easy access.
Waterproofing a niche requires the same care as the rest of the shower. Membranes must wrap into the cavity and bond to all interior surfaces. The niche floor should slope slightly toward the shower to prevent water from pooling inside.
4. Proper Shower Taps and Fixture Height Installation
Shower taps and fixtures must sit at heights that suit all household members. Too high, and shorter users struggle to reach controls. Too low, and taller users must stoop. Australian plumbing guidelines recommend mounting mixer taps between 900 and 1200 millimetres above the finished floor.
Showerheads typically install at 1800 to 2100 millimetres, depending on ceiling height and user preference. Adjustable rails offer flexibility for households with varied needs. Fixed showerheads should aim to clear the tallest user by at least 150 millimetres.
Fixture placement also affects waterproofing and tiling. Tap bodies and showerhead outlets penetrate the wall and create potential leak points. Installers must seal these penetrations carefully and ensure backing plates sit flush with the finished tile surface.
5. Selecting Durable Materials for Shower Installation Basics
Choosing the right materials is one of the most important parts of shower installation because it affects both long-term performance and day-to-day maintenance. Showers are exposed to constant moisture, heat, cleaning products, and repeated use, so weak or unsuitable materials tend to fail much faster. Understanding which materials perform best in wet areas helps homeowners make better decisions about durability, appearance, and upkeep.
| Material Category | Main Options | Key Benefits | Important Considerations |
|---|---|---|---|
| Tile Types | Porcelain, ceramic, natural stone, glass | Wide design variety and different performance levels for wet areas | Water absorption, slip resistance, maintenance needs, and surface finish all matter |
| Porcelain Tiles | Matte, polished, textured finishes | Low water absorption, strong durability, and good resistance to temperature changes | Textured finishes improve grip but may be harder to clean |
| Ceramic Tiles | Wall and light-use shower applications | More affordable than porcelain and available in many styles | Absorbs more water and may be less suitable for busy shower floors |
| Natural Stone | Premium shower walls and feature areas | High-end appearance and natural visual character | Requires regular sealing to prevent staining and moisture damage |
| Glass Tiles | Modern feature walls and decorative accents | Stylish finish and strong visual impact | Shows water spots and soap residue more easily |
| Backing Boards | Cement sheeting, waterproof gypsum boards | Better moisture resistance and stronger support than standard plasterboard | Correct installation is still essential for long-term waterproofing performance |
| Grout Types | Epoxy grout, cement-based grout | Helps seal tile joints and affects long-term maintenance | Epoxy resists stains and mould better, while cement grout needs sealing and more upkeep |
| Grout Colour | Light grout, dark grout | Changes the final appearance of the shower | Light grout shows grime more easily, while dark grout can fade with harsh cleaners |
Selecting durable shower materials is not just about choosing what looks best on installation day. The right combination of tiles, grout, sealants, and backing boards helps reduce future repairs, improves moisture resistance, and keeps the shower performing well over time. By focusing on both appearance and wet-area durability, homeowners can create a shower that stays functional, attractive, and easier to maintain for years.
When to Hire Licensed Professionals for Shower Installation
DIY shower installation appeals to budget-conscious homeowners. Yet the technical demands and compliance requirements often exceed amateur skill levels. Mistakes in waterproofing, plumbing, or tiling can cost more to fix than hiring professionals from the start.
Licensed renovators bring specialised tools, trade knowledge, and insurance coverage. They understand local building codes and maintain current certifications. Their work comes with warranties that protect you if defects appear after completion.
We have completed hundreds of bathroom renovations across Sydney. Our team handles every aspect from design and material selection to plumbing, waterproofing, and finishing. We ensure your shower meets Australian Standards and delivers years of reliable performance.
Conclusion
Quality shower installation requires attention to details that many homeowners overlook. Proper waterproofing, accurate drainage slope, strategic niche placement, correct fixture height, and durable materials all contribute to long-term performance. Skipping any of these basics leads to leaks, mould, and costly repairs.
Antons Renovation brings over 15 years of bathroom renovation expertise to every shower installation across Sydney. Our licensed team ensures waterproofing, drainage, and compliance are done right from the start. Get started with a trusted local specialist today.
Related Articles
- Top Bathroom Shower Design Trends Homeowners Love
- How to Ensure Quality in Your Bathroom Shower Installation
FAQs
What Tools Do I Need For Shower Installation?
For shower installation, you’ll typically need tools such as a tape measure, level, screwdriver, pliers, utility knife, and a drill. Depending on the specific project, you might also require additional tools like a tile cutter or plumbing wrench. At Antons Renovation, we have all the necessary tools and expertise to ensure a smooth installation process.
How Do I Install A Shower Base?
To install a shower base, first, prepare the area by ensuring the subfloor is level and clean. Next, follow the manufacturer’s instructions to position the base, ensuring proper drainage alignment. Secure the base with adhesive or screws as required. Our experienced team at Antons Renovation ensures that every shower base installation is done correctly for optimal performance and longevity.
What Are The Steps To Install A Shower Valve?
Installing a shower valve involves turning off the water supply, cutting access holes if needed, and then attaching the valve to the water lines. You’ll need to secure the valve in place and connect the showerhead and control handles. Antons Renovation’s skilled professionals handle these steps with precision, ensuring your shower functions flawlessly.
Do I Need A Permit For Shower Installation?
In most cases, a permit is required for shower installation, especially if plumbing work is involved. It’s essential to check with your local council for specific regulations. Antons Renovation operates in compliance with all NSW Fair Trading licensing requirements, ensuring that all necessary permits are obtained for your project.
How Long Does It Take To Install A Shower?
The time it takes to install a shower can vary based on the complexity of the project, but typically it ranges from a few days to a week. Antons Renovation prides itself on a streamlined process, aiming for a fast turnaround while maintaining high-quality workmanship to minimize disruption to your home.
