Your shower base takes a beating every single day. Water exposure, weight, temperature changes, and daily use combine to wear down even the most durable materials. Small cracks can quickly turn into major leaks if you ignore them. The good news is that many shower base issues can be repaired effectively, saving you from a full replacement.
This guide walks you through practical shower base repair tips that actually work. You’ll learn how to spot damage early, fix minor issues yourself, and know when to call in professionals for lasting results.
Key Takeaways
- Early detection of shower base damage prevents costly water damage and structural issues.
- Minor cracks under 5mm can often be repaired with epoxy or acrylic repair kits.
- Professional relining offers a cost-effective alternative to complete shower base replacement.
- Regular maintenance and proper cleaning extend the lifespan of your shower base significantly.
- Knowing when to repair versus replace saves both time and money in the long run.
Understanding Common Shower Base Damage
Shower bases fail for specific reasons. Understanding these causes helps you prevent future problems and make smarter repair decisions. Most damage starts small but grows over time if left untreated.
| Material Type | Expected Lifespan | Common Issues |
|---|---|---|
| Acrylic | 10-15 years | Surface scratches, colour fading, minor cracking |
| Fibreglass | 5-10 years | Gel coat deterioration, flexing, stress cracks |
| Tile | 15-20 years | Grout failure, tile cracking, waterproofing breakdown |
| Stone Resin | 15-25 years | Staining, minor chips, sealant degradation |
The material of your shower base determines how it ages and what problems you’ll face. Acrylic bases typically last 10 to 15 years, while fibreglass versions may only give you 5 to 10 years of reliable service.
How to Assess Shower Base Damage
Before you can fix anything, you need to know exactly what you’re dealing with. A proper assessment determines whether you can handle the repair yourself or need professional help. Take your time with this step because it guides every decision that follows.
Start by examining the entire shower base in good lighting. Look for obvious signs of damage first, then check for subtle issues that might not be immediately visible.
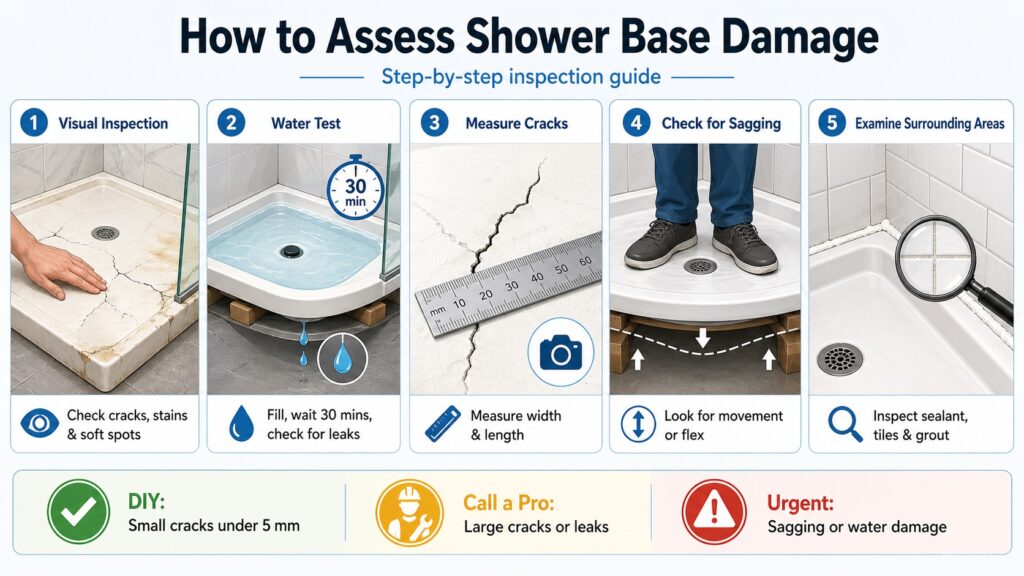
Visual Inspection
Check for cracks of any size across the entire surface. Look closely at corners and edges where stress concentrates. Discolouration often indicates water penetration or mould growth beneath the surface.
Run your hand across the base to feel for soft spots or areas that flex more than they should. These indicate structural weakness that may require more than surface repair.
Water Test
Plug the drain and fill the base with water. Let it sit for 30 minutes and check for any water level drop. Inspect the ceiling or floor below for moisture or dripping.
This simple test reveals leaks that might not be visible from above. If you notice water loss, the problem extends beyond surface damage.
Measuring Crack Size
Use a ruler to measure crack width and length accurately. Cracks under 5mm wide are generally repairable with DIY methods. Anything larger requires professional assessment and likely professional repair.
Take photos of all damage for your records. This documentation helps if you decide to consult with renovation specialists about the best approach.
Checking for Sagging
Stand in different areas of the shower base and notice any movement or flexing. A properly supported base should feel solid underfoot. Sagging indicates serious structural issues that simple crack repair won’t fix.
If the base moves noticeably, the support structure underneath has likely failed. This situation almost always requires professional intervention to prevent complete failure.
Examining Surrounding Areas
Inspect the sealant around the base perimeter for gaps or deterioration. Check wall tiles near the base for looseness or cracking. Look at the grout lines for signs of water penetration.
Damage rarely exists in isolation. Problems with surrounding areas often point to larger waterproofing issues that need addressing.
Signs Your Shower Base Needs Immediate Attention
Some problems can’t wait. Certain warning signs indicate damage that will worsen rapidly without intervention. Recognizing these urgent issues helps you act before minor problems become major disasters.
Water damage spreads quickly once it starts. What seems like a small issue today can compromise your bathroom structure within weeks if left unchecked.
- Water pooling outside the shower area: This indicates active leaking that’s damaging surrounding floors and potentially the structure below.
- Musty odours that won’t go away: Persistent smells suggest hidden mould growth from ongoing moisture problems.
- Visible mould on walls or ceiling: Surface mould points to moisture penetration that requires immediate investigation.
- Soft or spongy feeling when standing on the base: This means the support structure has failed and collapse could be imminent.
- Cracks that are growing or multiplying: Active damage progression won’t stop on its own and will accelerate over time.
- Water stains on the ceiling below: Leaks have already caused damage beyond the bathroom and need urgent repair.
If you notice any of these signs, contact professionals immediately. Quick action limits damage and often reduces overall repair costs significantly.
Material Selection for Long-Lasting Repairs
The materials you choose determine how long repairs last. Quality products designed for wet environments outperform general-purpose alternatives every time. This is one area where cutting costs almost always backfires.
Epoxy vs. Acrylic Repair Compounds
Epoxy offers superior strength and durability for fibreglass repairs. It bonds extremely well and resists water penetration effectively. Acrylic compounds work better for acrylic bases, providing flexibility that matches the base material.
Using the wrong product for your base material leads to repairs that crack or separate. Material compatibility matters as much as application technique.
Sealant Quality
Premium silicone sealants resist mould growth and maintain flexibility longer. They adhere better to wet surfaces and cure more reliably. Cheap sealants break down quickly in constant moisture exposure.
We use commercial-grade sealants designed specifically for shower applications. These products last years longer than hardware store varieties.
Relining Materials
Professional relining systems use specialized resins that bond permanently to existing surfaces. These materials are engineered for wet area use with superior waterproofing properties. They resist staining, cracking, and wear better than original shower base materials.
The quality difference between professional and DIY relining products is substantial. This is one repair where professional materials and application make a significant difference.
We source materials from trusted suppliers who specialize in bathroom products. These premium options cost slightly more upfront but deliver significantly better long-term results.
Understanding Waterproofing in Shower Base Repair
Waterproofing is the foundation of any shower repair. Without proper water barrier protection, even perfect cosmetic repairs will fail. This critical layer prevents moisture from reaching areas where it causes structural damage.
Australian building standards require specific waterproofing methods for wet areas. Professional repairs must include proper waterproofing to ensure compliance and long-term performance.
Waterproofing Membrane Systems
Modern waterproofing uses membrane systems applied beneath and around the shower base. These create a continuous barrier that directs water to the drain. Any breach in this system allows water to escape into surrounding structures.
Repairs that don’t address waterproofing integrity provide only temporary solutions. We assess waterproofing condition during every shower base evaluation.
Common Waterproofing Failures
Deteriorated sealants around the base perimeter allow water through. Cracks in the base itself can penetrate the waterproofing layer. Poor initial installation sometimes means inadequate waterproofing was never properly established.
These failures require professional remediation to prevent ongoing damage. Surface repairs alone won’t solve waterproofing problems.
Compliance Requirements
NSW building regulations specify waterproofing standards for bathroom renovations and repairs. Licensed contractors must follow these requirements and provide certification. This protects you legally and ensures insurance validity.
Our work includes all necessary waterproofing compliance documentation. You get peace of mind knowing everything meets current standards.
DIY Shower Base Repair for Minor Damage
Small cracks and chips don’t always require professional help. With the right materials and careful technique, you can handle minor shower base repair yourself. This approach works well for hairline cracks and surface damage that hasn’t compromised the base structure.
Success depends on proper preparation and using quality materials designed specifically for wet environments. Rushing through steps or using the wrong products leads to repairs that fail quickly.
1. Gather Your Materials
Purchase a shower repair kit designed for your base material. Epoxy resin works well for fibreglass, while acrylic repair compounds suit acrylic bases. You’ll also need sandpaper, cleaning supplies, and protective gloves.
Quality matters here. Cheap repair kits often fail within months, forcing you to redo the work or finally call in professionals.
2. Clean the Damaged Area Thoroughly
Remove all soap scum, oils, and debris from the crack or chip. Use a degreaser and let the area dry completely. Any contamination prevents proper adhesion of repair materials.
This step takes longer than you think. Give the area at least 24 hours to dry fully before proceeding.
3. Sand the Surface
Lightly sand around the damaged area to create texture for better bonding. Wipe away all dust with a damp cloth. The surface should feel slightly rough to the touch.
Don’t sand too aggressively or you’ll create more damage. Light scuffing is all you need.
4. Apply the Repair Compound
Mix epoxy or acrylic filler according to package directions. Apply it carefully to fill the crack completely, slightly overfilling to allow for shrinkage. Work quickly as most compounds begin setting within minutes.
Use a putty knife or spreader to smooth the surface level with the surrounding area. Remove excess material before it hardens.
5. Allow Proper Curing Time
Let the repair cure for the full time specified on the product. This usually ranges from 24 to 72 hours. Don’t use the shower during this period, even if the surface feels dry.
Rushing this step is the most common reason DIY repairs fail. Patience here pays off with lasting results.
6. Sand and Finish
Once fully cured, sand the repair smooth with fine-grit sandpaper. Blend it into the surrounding surface so it’s barely noticeable. Clean away all sanding dust.
Some repair kits include colour-matched gel coat or paint for final finishing. Apply this if needed to match your shower base colour.
7. Seal and Test
Apply a waterproof sealant over the repair area. Let it dry completely before testing. Run water over the repair and check for any leaks or softening.
If the repair holds up after several showers, you’ve successfully extended your shower base life. If problems persist, it’s time to consider professional solutions.
When Professional Shower Base Repair Makes Sense
Some damage goes beyond DIY fixes. Knowing when to call professionals saves you from wasting time and money on repairs that won’t last. Professional intervention also prevents small problems from becoming major structural issues.
We see homeowners across Sydney’s Inner West, North Shore, and Hills District who tried DIY repairs multiple times before finally seeking expert help. Starting with professional assessment often costs less in the long run.
- Cracks exceeding 5mm in width: These indicate structural stress that surface repairs can’t address properly.
- Multiple cracks appearing simultaneously: This pattern suggests underlying support failure rather than isolated damage.
- Visible sagging or flexing: The base structure has compromised and needs rebuilding or replacement.
- Water damage to surrounding areas: Leaks have spread beyond the base, requiring waterproofing work.
- Recurring repairs in the same spot: If your DIY fix failed once, it will likely fail again without addressing root causes.
- Age-related deterioration: Bases nearing the end of their expected lifespan often need replacement rather than repair.
Our team assesses damage honestly and recommends the most practical solution for your situation. Sometimes that’s a simple professional repair, other times replacement makes more sense.
Shower Base Relining as a Repair Option
Relining offers a middle ground between basic repair and full replacement. This process involves applying a new surface layer over your existing shower base. It addresses cosmetic issues while reinforcing the structure underneath.
The Relining Process
Professionals thoroughly clean and prepare the existing base surface. They repair any structural damage before applying the new liner. A bonding agent ensures the new surface adheres permanently to the old base.
The actual liner material gets applied in liquid form and cures to create a seamless, waterproof surface. This eliminates grout lines and seams where leaks commonly develop.
Benefits of Professional Relining
Relining costs less than complete replacement while delivering similar results. The process typically completes in one to two days, minimizing bathroom downtime. You get a fresh, modern look without demolition and reconstruction.
The new surface is often more durable than the original. Modern relining materials resist staining, cracking, and wear better than older shower base materials.
When Relining Works Best
This approach suits bases with surface damage but sound structural support. It’s ideal for updating appearance while addressing minor functional issues. Relining also works well when you want to change colour or finish without full replacement.
If the base structure has failed or severe cracking exists, relining won’t provide a lasting solution. An honest assessment determines if your shower base is a good candidate.
Maintenance After Relining
Relined surfaces need gentle cleaning products without harsh abrasives. Avoid impact from dropped objects that could chip the new surface. Proper care helps your relined base last 10 to 15 years or more.
Regular inspection catches small issues before they become major problems. This proactive approach maximizes your investment in professional relining.
Professional relining can transform a worn, stained, or slightly damaged base into what looks and performs like new. The process takes less time than replacement and causes less disruption to your home.
Working with Professional Renovation Specialists
Professional help delivers results that last. We bring 15 years of bathroom renovation experience to every shower base repair project. Our licensed team understands the difference between quick fixes and lasting solutions.
Our Assessment Process
We start with a thorough on-site inspection of your shower base and surrounding areas. This reveals not just obvious damage but underlying issues that might not be visible. We test for leaks, check structural support, and assess material condition.
You receive a clear explanation of what we find and what it means for your bathroom. We discuss all viable options with realistic expectations for each approach.
Quality Materials and Methods
We use premium repair materials designed specifically for Australian conditions. Our techniques follow manufacturer specifications and industry best practices. This combination ensures repairs hold up under daily use and Sydney’s variable climate.
All work meets Australian building standards for wet area construction. We document our process and provide certification where required for waterproofing work.
Transparent Communication
You’ll know exactly what we’re doing and why at every stage. We explain technical aspects in plain language without jargon. Questions are welcome and answered thoroughly.
Our timeline estimates are realistic and we stick to them. We respect your home and minimize disruption to your daily routine.
Service Areas
We serve homeowners throughout Sydney Metro, including the Inner West, Eastern Suburbs, North Shore, Northern Beaches, Hills District, Western Sydney, and Sutherland Shire. Our local knowledge helps us understand common issues in different areas and building types.
Whether you’re in a heritage home in the Inner West or a modern apartment on the North Shore, we’ve handled similar projects in your area.
From initial assessment through final testing, we handle shower base repairs with the same attention to detail we apply to complete bathroom renovations. You get honest recommendations based on what actually works, not what generates the biggest invoice.
Conclusion
Your shower base doesn’t have to fail prematurely. Regular maintenance, early damage detection, and appropriate repairs extend its functional life significantly. Know when DIY fixes work and when professional help delivers better value. We’re here to help Sydney homeowners make smart decisions about shower base repair and bathroom renovations. Call 0466 334 065 or request a free onsite quote to discuss your specific situation with our experienced team.
Antons Renovation brings over 15 years of bathroom renovation expertise to Sydney homeowners. Our licensed team handles everything from shower base repairs to complete bathroom transformations with precision. Get started on extending your bathroom’s life today.
Related Articles
- Shower Leaking Repair Tips to Save Time and Money
- How Much Does Shower Leak Repair Cost? A 2026 Complete Guide
- Top 5 Signs You Need Shower Tray Repair Before It’s Too Late
FAQs
How Do You Repair A Shower Base?
To repair a shower base, first, identify the damage and clean the area thoroughly. If there are cracks, use a suitable epoxy or repair kit designed for shower bases. For larger issues, consider consulting a professional, like Antons Renovation, to ensure a durable and seamless repair.
What Is The Best Way To Fix A Cracked Shower Base?
The best way to fix a cracked shower base is to use a high-quality epoxy filler specifically designed for bathroom surfaces. Apply the filler according to the manufacturer’s instructions and allow it to cure properly. For extensive cracks, reaching out to our experienced team can provide a more comprehensive solution.
Can You Patch A Shower Base?
Yes, you can patch a shower base, especially if the damage is minor. Use a repair kit that matches the material of your shower base, and follow the application instructions carefully. If you’re unsure or the damage is significant, Antons Renovation can assist in achieving a long-lasting repair.
How Much Does It Cost To Repair A Shower Base?
The cost to repair a shower base can vary widely depending on the extent of the damage and the materials used. Minor repairs may cost a few hundred dollars, while more extensive work could increase the price. For a detailed estimate, consider consulting with our experienced team at Antons Renovation.
What Materials Are Needed For Shower Base Repair?
Materials needed for shower base repair typically include an epoxy filler or repair kit, sandpaper, a putty knife, and cleaning supplies. Depending on the damage, you may also require caulk or sealant. Antons Renovation can help you select the right materials for a professional finish.
