Your bathroom works hard every single day. Water flows, drains empty, and fixtures endure constant use. Small issues like a dripping tap or slow drain might seem minor at first. Left unchecked, they can lead to water damage, mould growth, and expensive repairs down the line.
This guide walks you through five essential bathroom repair basics that every homeowner should understand. You’ll learn how to fix small leaks, clear simple clogs, maintain grout and caulk, improve ventilation, and use shut-off valves correctly. We’ll also highlight when it’s time to call in licensed professionals like our team at Antons Renovation for waterproofing, compliance work, or full bathroom upgrades across Sydney.
Key Takeaways
- Fixing small leaks early prevents water damage and reduces wastage.
- Clearing bathroom drains mechanically is safer than relying on harsh chemicals.
- Fresh grout and caulk protect wet areas from moisture infiltration.
- Proper ventilation stops mould and extends the life of your bathroom finishes.
- Knowing how to shut off water quickly minimises damage during emergencies.
1. How to Fix Small Leaks in Taps and Showerheads
A dripping tap might only waste a few litres per day. Over a year, that adds up to thousands of litres and a noticeable spike in your water bill. Most leaks happen because washers, O-rings, or cartridges inside the tap wear out over time. Replacing these parts is straightforward if you have the right tools and a little patience.
Start by turning off the water supply to the tap. You’ll usually find an isolation valve under the sink or behind the wall panel. Open the tap to release any remaining pressure, then use a screwdriver or spanner to remove the handle and expose the internal components. Worn washers and O-rings are the usual culprits behind drips. Swap them out with identical replacements from your local hardware store.
Showerheads can also develop leaks where they connect to the shower arm. Unscrew the showerhead by hand or with a wrench, clean the threads, and wrap fresh plumber’s tape around them before screwing it back on. This creates a watertight seal and stops drips at the connection point.
2. Clearing Simple Bathroom Drain Clogs
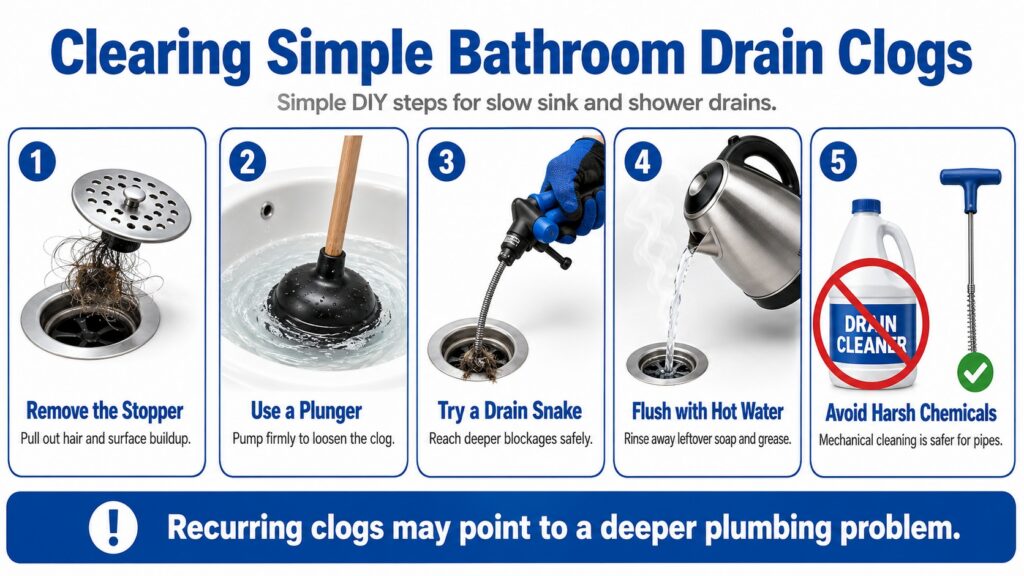
Hair, soap scum, and toothpaste build up in bathroom drains faster than you think. A slow drain is annoying. A completely blocked sink or shower can bring your morning routine to a halt. The good news is that most clogs sit close to the surface and respond well to mechanical cleaning.
Remove the Stopper or Drain Cover
Unscrew or lift out the drain cover to access the trap. You’ll often find a clump of hair and debris sitting right there. Pull it out with gloved fingers or needle-nose pliers.
Use a Plunger
Fill the sink or shower tray with enough water to cover the plunger cup. Press down firmly and pump up and down to create suction. This dislodges blockages and pushes them through the pipe.
Try a Drain Snake or Auger
If the plunger doesn’t work, feed a drain snake into the pipe. Turn the handle to catch hair and gunk, then pull it back out. This method reaches deeper clogs without damaging your pipes.
Flush with Hot Water
Once the blockage clears, pour a kettle of hot water down the drain. This washes away residual soap and grease, leaving the pipe clean.
Avoid Harsh Chemical Cleaners
Chemical drain cleaners can corrode older pipes and harm the environment. Mechanical methods are safer and just as effective for most household clogs.
For stubborn or recurring blockages, you might have a problem further down the line. Tree roots, collapsed pipes, or poor fall can all cause persistent drainage issues. Our renovators can assess your plumbing layout and recommend solutions, from pipe relining to full bathroom redesigns that improve drainage and comply with current codes.
3. Maintaining Grout and Caulk to Prevent Water Damage
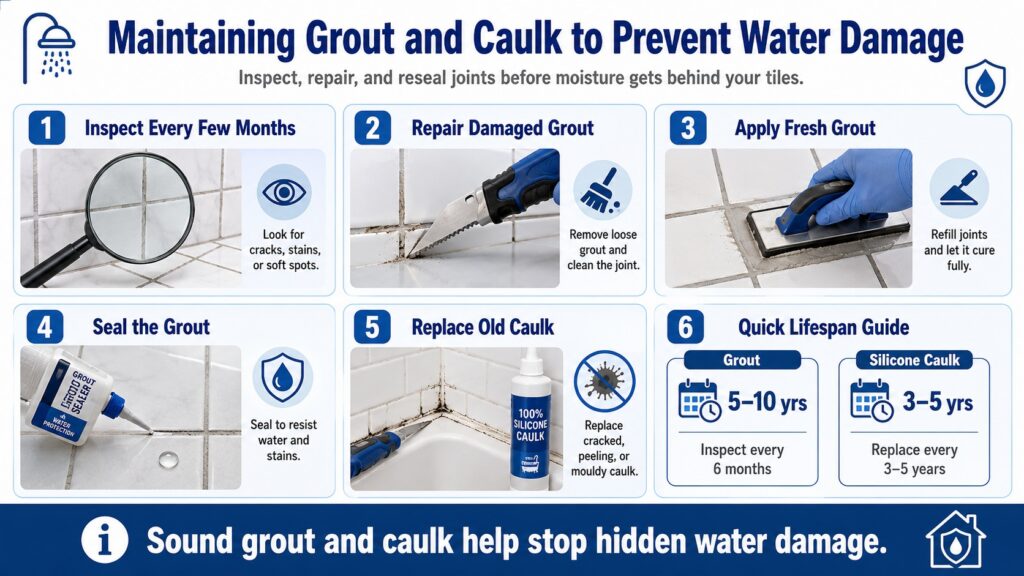
Grout and caulk form the first line of defence against water infiltration. Grout fills the gaps between tiles, while caulk seals joints where tiles meet fixtures like baths, shower trays, and vanities. Over time, both materials can crack, shrink, or develop mould. When that happens, water seeps behind tiles and into wall cavities, causing structural damage and mould growth.
Inspect your grout lines every few months. Look for cracks, discolouration, or soft spots. If you spot damage, scrape out the old grout with a grout saw or utility knife, clean the joint thoroughly, and apply fresh grout. Let it cure for the time specified on the package, then seal it with a grout sealer to repel water and stains.
| Material | Lifespan | Common Issues | Maintenance Frequency |
|---|---|---|---|
| Grout | 5–10 years | Cracking, staining, mould | Inspect every 6 months |
| Silicone Caulk | 3–5 years | Shrinking, peeling, mildew | Replace every 3–5 years |
Caulk around your bath, shower, and basin should feel firm and flexible. If it’s cracked or peeling, cut it out with a sharp blade, clean the surface with methylated spirits, and apply a new bead of silicone caulk. Smooth it with a wet finger or caulking tool for a neat finish. This simple task takes less than an hour and can prevent thousands of dollars in water damage.
4. Improving Bathroom Ventilation to Stop Mould
Mould thrives in damp, poorly ventilated spaces. Your bathroom generates steam every time you shower or run hot water. Without adequate airflow, that moisture condenses on walls, ceilings, and grout lines. Over time, black mould appears, paint peels, and timber frames rot.
The simplest fix is to open a window during and after showers. If your bathroom has no window, an exhaust fan is essential. Check that your fan is working by holding a piece of tissue paper near the grille. If the paper doesn’t stick, the fan isn’t pulling enough air. Clean the grille and blades with a damp cloth to remove dust and lint. If the fan still underperforms, it might be underpowered or blocked.
Building codes in New South Wales require bathroom exhaust fans to meet minimum airflow standards. An undersized fan won’t clear moisture effectively. When we renovate bathrooms, we install ducted exhaust fans sized to the room’s volume, vented to the outside, and fitted with timers or humidity sensors for automatic operation. This keeps your bathroom dry and mould-free without you having to remember to switch it on.
Simple Steps to Reduce Bathroom Humidity
- Run the exhaust fan during showers and for 15 minutes afterward.
- Wipe down wet surfaces with a squeegee or towel after use.
- Leave the bathroom door open when the room is not in use to promote cross-ventilation.
- Use a dehumidifier in bathrooms with persistent moisture problems.
- Check that your exhaust fan ducts to the outside, not into the roof cavity.
If you’re planning a bathroom upgrade, consider adding a larger fan, a heated towel rail, or underfloor heating. These features reduce condensation and improve comfort. Our team can design a ventilation solution tailored to your home’s layout and your family’s needs.
5. Knowing How to Use Shut-Off Valves in an Emergency
Every homeowner should know where their water shut-off valves are and how to use them. When a pipe bursts or a tap fails, turning off the water quickly can mean the difference between a small repair and a flooded room. Most bathrooms have isolation valves under sinks and behind toilets. The main shut-off valve for your house is usually near the water meter or where the supply line enters the building.
Locate your shut-off valves now, before an emergency happens. Turn them clockwise to close and anticlockwise to open. If a valve is stiff or corroded, apply a little penetrating oil and work it gently until it moves freely. Label each valve with a waterproof tag so anyone in your household can find it in a hurry.
When you turn off the water, open a tap on the same line to release pressure and drain any remaining water. This stops back-siphoning and makes it safer to work on the fixture or pipe. Once the repair is complete, turn the valve back on slowly to avoid water hammer, which can damage pipes and fittings.
What to Do If a Valve Fails
Old valves can seize or leak when you try to operate them. If your isolation valve won’t close or starts dripping, you’ll need to shut off the main supply and replace the valve. This is a job for a licensed plumber, especially if the valve is part of your home’s main water line. Our renovators can upgrade ageing plumbing as part of a broader bathroom or laundry renovation, replacing old gate valves with modern quarter-turn ball valves that operate smoothly and seal reliably.
When DIY Isn’t Enough for Bathroom Repair Basics
The repairs we’ve covered are within reach for most homeowners. They save money, prevent damage, and give you confidence in maintaining your home. But some jobs require licensed trades, specialised tools, and compliance with building codes. If you’re dealing with concealed leaks, failed waterproofing, outdated plumbing, or structural issues, it’s time to call in professionals.
| Repair Type | DIY Suitable? | Professional Required? |
|---|---|---|
| Dripping tap washer | Yes | No |
| Blocked sink drain | Yes (mechanical methods) | Only if recurring |
| Cracked grout or caulk | Yes | No |
| Leaking shower base | No | Yes (waterproofing failure) |
| Corroded shut-off valve | No | Yes (licensed plumber) |
| Mould behind tiles | No | Yes (structural assessment needed) |
We don’t offer standalone resealing or minor repair services. Our focus is on complete renovation and upgrade projects, including bathrooms, kitchens, laundries, and accessibility solutions. Every project complies with NSW Fair Trading licensing requirements and relevant Australian building standards. We use premium fixtures, fittings, and finishes from trusted suppliers, and we document progress clearly so you know exactly what’s happening at every stage.
From compact apartments in the Eastern Suburbs to family homes in Western Sydney, we tailor every design to your budget, lifestyle, and home. Our mission is simple: create functional, stylish, and lasting spaces, delivered with precision, transparency, and workmanship you can trust.
Why Choose Antons Renovation for Your Bathroom Upgrade
We’ve been transforming homes across Sydney for over 15 years. Our team includes licensed builders, plumbers, tilers, and waterproofers who bring meticulous planning, open communication, and attention to detail to every project. We listen to your vision, design around your needs, and deliver a bathroom that looks stunning and works seamlessly for your lifestyle.
Whether you’re updating an outdated bathroom in the Inner West, adding accessibility features in the Hills District, or renovating a rental property on the North Shore, we’re ready to help. Call us on 0466 334 065 or request a free onsite quote to discuss your project.
Conclusion
Small repairs keep your bathroom running smoothly and protect your home from water damage. Fixing leaks, clearing drains, maintaining seals, improving ventilation, and knowing your shut-off valves are skills every homeowner should have. When issues go beyond simple fixes, trust a licensed team that delivers quality, compliance, and lasting results.
Antons Renovation brings over 15 years of bathroom renovation expertise to Sydney homeowners. Our licensed team handles everything from minor repairs to complete transformations with precision and care. Get started on your bathroom project today.
Related Articles
- 5 Essential Bathroom Maintenance Tips for Lasting Elegance
- 5 Common DIY Bathroom Waterproofing Mistakes to Avoid
- Essential Bathroom Renovation Materials List for Your Dream Space
FAQs
What Are The Basic Steps For Bathroom Repair?
The basic steps for bathroom repair typically involve identifying the issue, gathering necessary materials, preparing the work area, executing the repair (whether it’s fixing leaks, replacing tiles, or addressing mold), and finally, cleaning up and ensuring everything is functioning properly. At Antons Renovation, we ensure each step is handled with precision and care to deliver lasting results.
How Do I Fix Common Bathroom Issues?
Common bathroom issues like leaky faucets, clogged drains, or cracked tiles can be fixed by first diagnosing the problem, then taking appropriate action such as replacing washers, using a plunger, or re-grouting tiles. Our experienced team at Antons Renovation can help tackle these problems efficiently, ensuring your bathroom remains stylish and functional.
What Tools Do I Need For Bathroom Repairs?
Essential tools for bathroom repairs include a wrench, screwdriver set, plunger, tile cutter, caulking gun, and a utility knife. Having the right tools is crucial for effective repairs, and our skilled team at Antons Renovation is equipped with everything needed to handle any renovation project with expertise.
How Can I Tell If I Need To Hire A Professional For Bathroom Repairs?
If you encounter persistent issues, extensive water damage, or complex repairs that seem beyond your skill level, it’s wise to hire a professional. At Antons Renovation, our qualified team is ready to assess your needs and provide tailored solutions to ensure your bathroom is safe and beautiful.
What Are Some DIY Bathroom Repair Tips?
Some DIY bathroom repair tips include regularly checking for leaks, using baking soda and vinegar for unclogging drains, and applying caulk to prevent water damage. However, for significant renovations or repairs, relying on our expertise at Antons Renovation can save you time and ensure a professional finish.
